Seedling Heat Mat for Plants | ||||||||||
| ||||||||||
Product Description
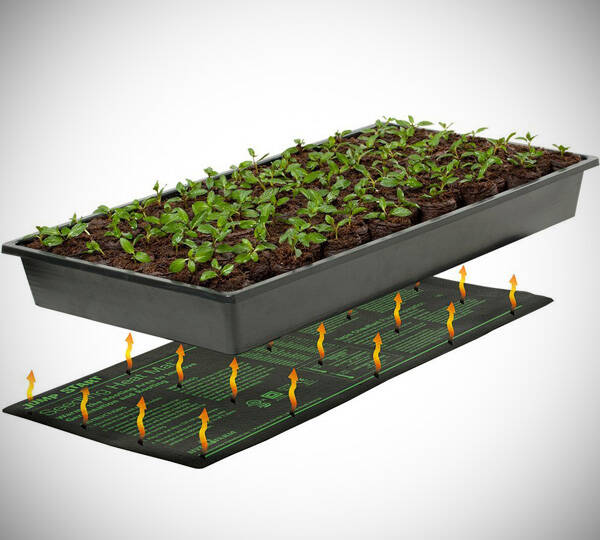
Hydrofarm heat mats are perfect for veteran growers, beginners, and children too. They improve germination by warming the root area 10-20°F over ambient temperature. By warming the roots, you increase your growing success! Bottom heat is one of the most important and effective ways to improve germination and rooting. The seedling heat mats have been re-engineered for better performance and greater durability! The new, stronger heating wire and thicker multi-layer construction offer more uniform heating and the durability to withstand rugged greenhouse environments. Hydrofarm heat mats allow you to maintain desired fermentation temperatures in carboys and controllable heating for other hobbies, including homebrewing, Kombucha and Kefir. Measures 8.87" x 19.5", InchesFeatures
- Warms root area 10-20˚F over ambient temperature to improve germination to Increase success of seedlings and cuttings
- 6 foot power cord and waterproof construction with lighting, watering, and planting information printed on mat for easy use
- Increases success of seedlings and cuttings
- Rugged and durable with waterproof connectors - plug into our Digital Heat Mat Thermostat (MTPRTC - required, sold separately)
- 50% thicker construction compared to other brands

Top Reviews
I've used these mats for over a decade...by ChuckleHead (4 out of 5 stars)
December 7, 2018
I have used Hydrofarm heat mats to germinate seeds and to root clones for over 15 years. It speeds up both processes and increases rooting success when used to clone using rooting cubes. Hydrofarm is a name I trust for many of my hydroponic needs. This product is well made and lays flat, increasing the contact with the tray. I germinate trays inside, at room temperature. Hydrofarm mats heats trays without the need of a thermostat. I typically use mine under a twin T-8 light. I can place 4 domed trays under this light and realize well over 95% success rate of germination or rooting, using heated mats.
I germinate and clone on a heavy table, covered with a towel. This is important to keep the heat in the trays. I place my trays and mat on the towel. The towel also collects any drips coming off the tray domes.
These are the same mats that come with Hydrofarm's JumpStart germination kits. I primarily germinate tomatoes and peppers, all without issue using these Jumpstart mats.
I still have and use my original Hydrofarm heating mats from 2003. They still look and perform as new. I purchased these mats because my gardening has increased.
I would recommend these mats to others...
Don't germinate expensive seeds without heat mats.
by Mac (5 out of 5 stars)
July 8, 2017
These mats promote germination exactly as described, and I wouldn't think of germinating expensive tomato, petunia, pepper, etc. seeds without bottom heat. I have used the mats for years, but more sizes are available at Amazon, and without the trip to town. The manufacturer recommends plastic under the mats to make the mats more efficient, the heat reflected upward to the trays of growing-pellets or pots. I use corrugated plastic sheets that are easily cut to size. And I use appropriate thermostats, too, for seeds need different bottom temperatures according to the species. There are many brands of heat mats on Amazon; I bought Jumpstart because I have used the brand for more than a decade, and all still work as expected. My recent purchase has been to expand my seed germination capacity, and I anticipate buying more mats before winter. The prices from Amazon sellers are quite competitive, too.
Insulate under the mat!
by Joey D. (5 out of 5 stars)
April 19, 2009
We are home gardeners and have tried many ways to provide bottom-heat for vegetable seed germination -- atop my always-on docked laptop was the most effective but the space was tiny. We bought a 20" x 20" heat mat and now have the right tool for the job. We set it up on a card table and found that it was not providing sufficient heat to the soil in the trays above. After an overnight on the mat, the soil surface was less than 10 degrees above ambient temperature. The room where the seeds are was 60 degrees overnight, and the soil surface in the trays was 68 degrees -- certainly not good enough for eggplant germination. I used an infrared thermometer (Raytek Minitemp MT6 here on Amazon) to check all temps. The exposed mat surface (no tray on top) was 82 degrees. I felt the surface on the underside of the card able and it was definitely warm, indicating heat loss downward. I wanted all of the heat to go up into the soil, so I cut a piece of rigid-foam insulation just slightly larger than the heat mat (22" x 22") and put it under the mat. Within 15 minutes the exposed surface of the mat was at 97 degrees and when I moved a tray to measure the temp of the mat beneath a tray, it was at 115 degrees. 2 hours later, the soil surface temperature was at 85 degrees. I am now confident the soil will get enough heat for proper germination, and I will begin using the heat mat thermostat to regulate soil temps based on the particular seeds we're starting (search the Web for "vegetable seed germination temperatures" to find one of the many reference charts available). We can also regulate temperature by covering or uncovering the trays to change the rate of evaporative cooling. We are well aware that covered soil is more prone to damping off/seedling death, which we now control with a spray of strong-brewed chamomile tea.
Robust
by DAC (5 out of 5 stars)
February 13, 2019
This is a 45W, "double wide" UL approved waterproof heat mat I will use under seed trays for starting vegetable seedlings to transplant into my vegetable patch. This is my first seedling mat experience and I chose to pay basically double the cost for this vs competing non UL (UL is a safety certification in the US) item rather than mess around with competing decently rated products but phrases like "thin wires" in customer reviews. No experience with the half cost units but this unit is thick, nicely made, no excuses with nice long sturdy cord that I will plug into a temperature controller but can plug into any 110v outlet. Is only 45 watt for 400 sq inches so tough to go wrong for seed germination application. Heats surprisingly quickly.
Face of mat has list of vegetables and germination times which is nice try but just a note to manufacturer that it is far more useful to have same list with optimal germination temperatures since seed temps can be directly controlled. I am using with a Century temperature controller and seems like good combination with seedling mat.
It's not powerful enough to fight the heat draw of something like a countertop
by McGregorMX (5 out of 5 stars)
May 12, 2015
I had a zucchini plant germinate withing 24 hours with this thing. By the end of the week, it was nearly 4" tall. Other plants germinated about 50% faster than normal as well! Well worth it, and a must if you are wanting to create a heat controlled greenhouse effect for your starter seeds. It does NOT include a thermostat, although without one it sits at about 78 degrees, so there isn't really a need for one either. Make sure you keep it on top of a piece of cardboard, or Styrofoam so what ever surface you are using doesn't leech the heat away from it. It's not powerful enough to fight the heat draw of something like a countertop, or concrete.
Excellent for Brewing Kombucha
by cryptix (5 out of 5 stars)
December 25, 2012
I love this heat mat. I use it for 7 day periods with it on 24/7 (no thermostat) placed underneath the gallon glass jar in which the kombucha I brew resides. It brews much faster in higher temperatures, and this heat mat provides 10 degree increase without ever getting dangerously hot.
We need to cheat Mother Nature and this helps us to do it in a cost effective manner.
by Todd M.,Top Contributor: Cooking (5 out of 5 stars)
January 17, 2019
Here in the high desert the growing season can be relatively short depending on when we see our last potential frost in the spring. Getting a jump on it so we're reading to plant as soon as the weather permits means chit early and get some sprouts started so there are some plants ready to drop in the ground. We were heating a space in a log cabin we have near our gardens but that pretty expensive for several months if the weather was unfavorable. We gave a heating pad a shot and now have several from different manufacturers because they work so well and pay for themselves in the first year of use. They keep the roots warm and that stimulates growth and we cover them at night to keep them warm and have them under LED grow lights 12-hours per day. It's worked well so far and we'll likely add a few more mats shortly. We have also used them (not sure if it was this one but they're all about the same) to keep some yogurt culture at the right temp and have wrapped it around some potted plants (like our indoor orange trees) to keep the roots warm rather than turning on the heat. No complaints other than they could be a little larger because a roughly 10" x 20" mat fills up fast once you move onto some small pots. I went with 5-stars because they work, they're cost effective and they eliminated what was once an expensive heating bill.
Works Great for Brewing Kombucha
by Dawn Fremo (5 out of 5 stars)
November 29, 2015
I've recently started brewing my own kombucha. We turn our heat off when we go to work, so the temperature in the house goes down to sixty-something during the day...too cold for producing a batch of kombucha in a week, which I consider ideal. I looked at various products for raising the temperature of the fermenting liquid in my crock. The heat wraps that I considered were priced at $45 and above, so I decided to give this seedling mat a try, at less than half the cost. I'm delighted with the results! I've made several batches of delicious kombucha. I bought a stick-on thermometer for my crock, so I know for certain that my brew is between 70 to 80 degrees at all times, the ideal brewing temperature. An additional bonus is that, after I put the finished kombucha in bottles with a little organic fruit juice in the bottom to do a second ferment, there's enough room on the mat to accommodate six 16-ounce bottles. The heat speeds up the second ferment, so in two days I have a six delicious, fizzy bottles of slightly fruity kombucha. I highly recommend this product to anyone who brews kombucha in a cold climate.
Saved my Kombucha brew!
by bmclaff (5 out of 5 stars)
May 13, 2016
This little mat is a Kombucha brewers must if you are having trouble keeping your brew warm! I live in a garden level apartment in Denver, Colorado, so it stays quite cool, especially in the Winter. At room temp my Kombucha was sitting at 62 degrees (ideally you want your brew to stay between 75-85 degrees). Once I received the mat, I wrapped it around my 1 gallon glass jar (see picture), secured it with electrical tape, and waited on pins and needles to see if it would do the trick. It sure as heck did! It actually kept it too warm...93 degrees. So I simply propped it up with a roll of electrical tape so that the mat only covers about 3/4 of the bottle, and now my brews stay consistently right around 82 degrees. Thank you Hydrofarm...you made this Kombucha brewer one happy camper!
For Late Winter Seed Starting Success! (My Setup)
by Kl (5 out of 5 stars)
January 2, 2014
I have used Hydrofarm seedling heat mats, thermostats, and lighting systems for years now and can attest to overwhelming success these have afforded me in getting my garden plants started in late winter.
This particular heat mat is a high-quality, reliable, waterproof, and durable. I have used this one, or ones like it for many years now without problems.
Heat mats and proper lighting are the key to consistent and prolific germination of seeds started in late winter to be ready for springtime planting.
Here's the setup I've used for the past few years:
-Park Seed Park's Double Bio Dome with 80 Jumbo Cells. I actually use 2-18 Jumbo Cell for a total of 36 plants. There are several sizes of the Bio-Dome system. I have the DOUBLE Bio-Dome which allows for two seed starting cells (Purchased from Park Seed)
-Hydrofarm MT10008 20-by-20-Inch Seedling Heat Mat (Purchased from Amazon)
-Hydrofarm FLT24 2-ft/ 4-Tube T5 Commercial System with Bulbs (Purchased from Amazon)
-Hydrofarm MTPRTC Digital Thermostat For Heat Mats (Purchased from Amazon)
-Style Selections 36-in H x 24-in W x 18-in D 3-Tier Steel Freestanding Shelving Unit (Purchased from Lowe's)
The modular, adjustable wire shelving unit gives me the foundation for my indoor winter seed-starting setup. The shelves are adjustable so that I can hang the grow light on the underside of the top shelf, then adjust the middle shelf so that the top of the Bio Dome is about 6-8 inches from the light. This allows for enough room to remove the top of the Bio Dome in the event I need to access the plants for watering, fertilizing, etc. The bottom shelf is great for storing my remaining planting supplies.
The light is almost the same size as the Double Bio-Dome and provides 100% light coverage necessary for young plants to thrive. A few years back, I tried to use a light that was only 2 bulbs and half the size of the one I currently use. You could tell that the young plants would angle toward the light hanging in the middle, and those on the outer edges didn't grow as quickly and tall as those in the middle. Take it from someone who spent $25 - $50 each year over the course of several years trying to find a light that would work well with my seed starting system. I knew about the Hydrofarm light early on, but wasn't too eager to purchase it due to it's higher cost. I wish I would have gotten it first because I would have saved money in the long run considering the poor-performing lights I purchased in years prior to getting the one listed above.
The Park Seed Bio Dome is an extraordinary seed-starting system that allows your plants to grow quite large without root binding problems found in other tray-type seed starting setups. Park uses the styrofoam cell matrix with replaceable organic bio-sponges in which the seeds are planted.
I regulate the temperature of the seed heat mat with the Hydrofarm MTPRTC Digital Thermostat set at between 85-90 degrees. This thermostat has a temperature probe you can insert into one of the organic bio-sponges to obtain a direct soil reading. I route the probe through one of the vent holes in the lid of the Bio-Dome.
In order to capture the most heat from the heat mat, while allowing the thermostat to regulate the temperature of the mat, I first take a folded beach towel and place it on the middle shelving rack. I then set the heat mat on top of the towel, then place the Bio-Dome on top of the heat mat. This allows me to recover most of the heat that would otherwise radiate from the exposed, bottom side of the heat mat.
Watering with the Bio-Dome setup is easy and, depending on how you have the vents adjusted in the lid, performed infrequently at best due to the efficiency of water vapor recovery of the Bio-Dome system.
I typically start tomato and pepper plants in mid-February so that they are ready for planting by the first week of May. You may want to check online for your indoor planting and outdoor transplanting dates depending on your region and climate.
I hope my sharing with you what has worked quite well for me will help you in your seed-starting endeavors!
Customers Who Bought This Item Also Bought
- JUMP START Heat Mat, 3" x 20" Inches MT10004 Waterproof Durable, 7.3 Watt UL Certified Seedling, 3"x20", 7.3W
- Hydrofarm MTMDU Heat Mat, 60x21, Black
- JUMP START MTMDA Jump Start Commercial Seedling Heat Mat Modular Add-on, 60" x 21", 140, 60x21, Black
- Hydrofarm Jump Start MT10008,45 Watt UL Certified Seedling Seedling & Germination Heat Mat, 20"x20", Black
- Hydrofarm Jump Start MT10009, 107 Watt UL Certified Seedling, 48"x20" Heat Mat, Jumpstart
*If this is not the "Seedling Heat Mat for Plants" product you were looking for, you can check the other results by clicking this link