Pizza Oven Grill | |||||||||||
| |||||||||||
Product Description
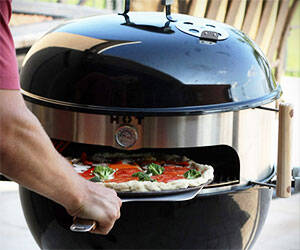
The KettlePizza Basic is a pizza oven conversion kit for 18.5 and 22.5 inch charcoal kettle grills. This product installs on top of your kettle grill transforming it into a charcoal or wood burning pizza oven. [Read more]Features
- Transforms 22.5" kettle grills like Weber One Touch Gold or Silver into a pizza oven.
- Heat remains stable because lid does not need to be removed to access food.
- Made of 20 gauge, 304 grade stainless steel. Made in USA.
- Use with a skillet to cook meats, fish or vegetables.
- Works with charcoal or hardwood.
Top Reviews
... feel I can honestly make grilled pizza just as good WITHOUT itby C. Leonard (2 out of 5 stars)
December 11, 2016
After using this a few times I feel I can honestly make grilled pizza just as good WITHOUT it! Simply put your dough on a pizza stone on your kettle grill and it pretty much comes out as good without spending $125 on this item. Sure, this thing looks cool when you add it to your kettle. But the price of this thing is outrageous for what you get. Then they try to tell you that you need an additional $125 baking steel griddle lid to make it the heat stay closer to the pizza.....which SHOULD BE part of this kettle pizza package! If money grows on trees at your house.....this is something that will produce a "Wow Factor" at your next barbecue. Unfortunately, it doesn't produce a better pizza. Buy a good $50 pizza stone and save the rest of your money for beer!
WOW!!!!!!!
by Justok55 (5 out of 5 stars)
June 14, 2014
I have been going back and forth on this purchase for a while, finally pulled the trigger and am glad I did. Set up was a breeze took about 10 mins. . Just fired it up and was shocked how it worked. I started with a chimney of kingsford charcoal let that get hot dumped into C shape as owners manual recommends, placed another pile of coals on top of that put on lid and let it heat up within minutes thermometer registered 500 opened lid put 3 pieces of hard wood logs in cover back on let it fire up for another 10 mins temp pegged at over 800. Formed my dough for a test run just a simple pie pecorino, EVO and garlic slid onto stone and it was puffing up instantly spun it every 30 seconds for about 2 mins held it up in the dome with my metal peal to crisp top and in less than 3 mins start to finish PIZZA PERFECTION.
This thing WORKS! I have made pizza professionally years ago and this rivals any thing we could turn out of a pro kitchen. Considered building a brick oven from scratch but between the cost at least 2,000 and the labor this is a very viable alternative. They have invented the proverbial "better mouse trap" .
On a budget Wood Fired Pizza, IT WORKS! with some help...
by deltadude (4 out of 5 stars)
September 8, 2015
This is a excellent product if you want to do pizza on your weber kettle. I am doing 14" pizza, that comes out with that great WFO taste, and they cook from 2 to 4 minutes. HOWEVER!!! YOU MUST BUY THE KETTLE BAKING STEEL!!! Without the steel the tops of the pizza will not be cooked. If you are on a tight budget, double or triple line the webber lid with heavy aluminum foil. Learning to use the KP takes lots of practice and experimentation! You will burn a lot of crusts. I have followed the instructions, watched videos, and finally just developed my own procedures for consistent results. CONSISTENT is the key word. I will make one suggestion that no one seems to mention, buy a 12" pizza screen when you order your KP kit. I use my own cordierite 5/8" Kiln shelf (18 bucks), and can cook pizza on the stone, but it burns the bottom frequently at Neapolitan temps of 800+ deg when loaded directly on the pizza stone, even when turning the pie every 20sec. A pizza screen gives you just the right amount of protection you still get good spring on your crust, and the bottoms are not charred, though they will have leapording spots, you still need to turn every 20-25 sec. I have 10,12,14 inch screens 2 of each so one can be building a pizza while other is cooking. NOTE if having a pizza party, you don't want burned, the pizza screen will make you look like a pro.
I think this product is over priced, as it is, it should include 2 additions at no additional cost. 1st two 12 inch pizza screens, 2nd an extruded metal mesh charcoal briquette holder screen. Such a holder will allow the briquettes to be stacked higher against the sides and keep the heat rising around the perimeter to heat the KP Steel. Also such a mesh grid would allow to start one end of charcoal and slowly work its way around thus giving the cook a longer period of cooking.
Bottom line, I recommend this product and with the additions I mentioned it would be perfect.
KettlePizza is the bomb!
by Renee Spindle (5 out of 5 stars)
September 13, 2011
The kids got this for me for my birthday, and am I glad they did. I have cooked pizza on my Weber before,but I was always a little disappointed with the results. I have had this device for two weeks, and we have used it every Friday night since we got it. I was a little worried that I would not get the advertised temps, but it was no problem.
I use one full Weber chimney starter of ordinary Kingsford Briquets, (my preferred, their cheap)arranged in a semi-circle around the back of the grill, then I add about 6-8 fist size chunks of either applewood or hickory. It takes about 10 minutes for the temp to max out both of the thermometers. I have a 14" pizza stone that I got from a local big box store, (again, it was cheap and it works), and I put that in the oven to warm up with the grill.
We make the dough from scratch using Fleischmans Pizza Crust yeast. You don't have to wait for the dough to rise, and it makes a bomb crust. We roll the dough out on a wood pizza peel, using plenty of corn meal to keep it from sticking. Then each of the kids will add what they want for toppings and it goes in the oven. Total prep time for the pizzas is about 15 minutes, and once it goes it the oven it take about 4-6 minutes to cook. Golden brown crust, hot melted toppings, YUMMM!
The grill stays hot enough to cook about 3-4 pizzas before adding more fuel. I never have added more charcoal, we just add more chunks of wood when the temps drop below 700, and the temp comes right back up. The first time we used it we cooked 7 pizzas, which around here was just about enough.
There was a note in the box that said if you posted a video of the oven in use on youtube, they would send you a free gift. I posted the video, sent them the link, and within a week I received a very nice BBQ apron and some other gifts along with a nice personal note. You can't go wrong with customer service follow through like that.
American Made, does what it says it will do, great customer follow through.
Nuff Said..
I cooked my first pizza on it and it came out like a pro
by Kim Suzanne (5 out of 5 stars)
March 21, 2016
I really researched and shopped around before I purchased this from Amazon. I cooked my first pizza on it and it came out like a pro!! We will be using this especially during the summer as it pretty much stay in the triple digits here (the Mojave Desert). I cannot believe it took less than 10 minutes to bake an entire pizza. I recommend that you go to the KettlePizza website to get pointers from some of the celebrity chefs that they have videos of. These pointers really did help me to cook a perfect pizza!
Don't Get This Unless You Like Getting Rave Cooking Reviews
by Bryan (5 out of 5 stars)
July 6, 2013
My Wife and Daughter got this for me for Father's Day and we love cooking on it. It does take some trial and error but usually even the errors were totally edible.
I've had pizza parties with a pizza bar of toppings and the only negative was watching everyone else chowing down and saying how great they are while getting another pizza on the grill. It does get hot standing in front of that 700 Deg. plus oven, but worth every singed hair.
I had one problem but it wasn't with the PizzaKettle itself, but with the grate. I bank the coals in the back of the grill and it would be logical to have the hinged grate aligned to allow the addition of charcoal and wood. However, this leaves the handle for the other hinged grate portion directly in the middle of the PizzaKettle opening. Solution, buy an extra grate and cut off one of the handles. I also cut off the hinged grate portion where I would be adding the wood and charcoal and made it even easier to add and help reduce the amount of time I had to have the kettle dome off.
My other tip is to not worry about getting the pizza close to the back where the flame is right away. For me this would result in accidentally pushing the pizza off the back side of the pizza stone when trying to slide my pizza peel back under it so i could spin it. Not good news! Instead I recommend first placing it closer to the opening and letting the bottom cook a little before trying to spin it.
My next purchase will be the pizza spinners from the manufacturer to try and spin the pizza inside the oven instead of needing to partially pull it out to spin it.
My other tip is to ensure you have some high temp leather barbecue or welding gloves. It helps when adding more wood because it gets VERY hot directly above the fire, hence the singed hairs mentioned above.
Overall Recommendation: Get it, enjoy the accolades and the pizza. My favorite accessory for my Weber Grill by far.
Best Pizza Oven - 18.5" Kettle Pizza
by Outdoor Chef (5 out of 5 stars)
October 28, 2013
The Kettle Pizza is an awesome system. We baked our first wood fired pizza and it came out fantastic. I used the stock pan to make the pizza. Pizza came out beautifully. I used a Weber Chimney Started, with 1/2 briquettes, 1/2 lump charcoal, 1/8 of a log of hardwood. Started my coals and made a "C" Shape after they were hot, as instructed. Added my log of hardwood, put on the Pizza Kettle and off we went. Temp reached the 700+ degree mark, put in my pizza on the pan, turned after about 2 minutes (keep an eye on it as it goes fast). It is easy to check looking in the opening. Pizza came out great. I will invest in the pizza stone for an even crisper crust, however, this worked very well. Just follow the instructions that came with it. It is simple. The new design and lower profile are great. the 18.5" Weber is perfect as it concentrates the heat and makes for a great little oven. My son and I even roasted a few marshmallows and they came out great. I will be trying to bake bread and pies next! Temperature control is straight forward using the Weber vents. Like any outdoor cooking you must keep a watchful eye. Thats all part of the fun!
We upgraded our old grill on Father's Day and put the old one out for the garbage. There was a Weber
by T. Manoogian (4 out of 5 stars)
September 28, 2016
We have been on the fence about a pizza oven for some time but are not living where we could invest in a permanent brick oven. We upgraded our old grill on Father's Day and put the old one out for the garbage. There was a Weber pizza attachment at the store which led me to begin some research......found this set up. It really does work GREAT. Our first attempt using a stone from our regular oven left us with burnt crusts, but we found an amazing two piece stone on amazon that fixed the crust issues. It's a bit pricy for what you get, but building it yourself would take some work.
tweak it a little and it's perfect
by Eric Hollingsworth (5 out of 5 stars)
August 29, 2013
Makes wood-fired pizza as good as any restaurant, but with a few extras that we bought for our 22.5 Weber. We bought Weber's char basket accessory to place behind the pizza stone, and a steel baking "stone" (pizza steel) that is placed above the pizza on a second standard grate (which we bought to sit above the KettlePizza insert). Pile at least one full chimney of hot coals in the very back of the Weber, place the bottom grate, then the basket filled with apple wood (hardwood) chunks in the back. Place the upper grate and steel on top of that, and close the vent in the dome lid. When the wood flames up, it heats the upper steel and reflects heat straight down onto the pizza, as the temp soars well past 750. Rotate the pizza on the bottom stone with a small peel or large spatula so that the wood fire doesn't burn the crust edge. At this temp your pizza is done in 5 minutes or less!
BEST PURCHASE EVER!
by Thaison Ta (5 out of 5 stars)
January 4, 2015
If you want to make a homemade pizza but do not have the space or skills to build a real brick oven pizza, you need to get this! Between spending $100 for the Weber Kettle and purchasing this Kettle Pizza kit, you can have a brick oven for less than $300. The temperature gets well past the 700 degrees and stays hot long enough to cook about 5 pizzas before having to add more wood to the flame. The only thing I wish it had was a way to close the front, because once the fire dies down the temperature drops pretty rapidly. It would be nice to conserve some of that so you do not have to add more hardwood so often. I would recommend rolling out a few pies while you heat up the wood.
Regardless, you will not be disappointed.
Customers Who Bought This Item Also Bought
- Pizza on the Grill: 100+ Feisty Fire-Roasted Recipes for Pizza & More
- Weber 7403 Char-Basket Charcoal Briquet Holders,Multi
- Kitchen Supply 14-Inch x 16-Inch Aluminum Pizza Peel with Wood Handle
- KettlePizza Extension Kit - Convert 22.5" KettlePizza for Use with 26.75" Weber Kettle Grill
- Made in USA KettlePizza Prograte and Tombstone Combination Kit for 22.5-Inch Kettle Grills, KPPG-22
- Cuisinart CPS-445 Pizza Grilling Set
- Weber 6691 Original Pizza Paddle, ONE SIZE, Stainless Steel
- Made in USA KettlePizza Stainless Baking Steel - Steel Skillet/Lid for 22.5" Kettle Grills
- The Original 'Upper Deck' Stainless Steel Grilling Rack/ Warming Rack /Smoking Rack/ Charcoal Grill Grate- Use with Weber 22 inch Kettle Grill- Charcoal Grilling Accessories and Grill Tools Grill Rack
- Chef Pomodoro Aluminum Metal Pizza Peel with Foldable Wood Handle for Easy Storage 12-Inch x 14-Inch, Gourmet Luxury Pizza Paddle for Baking Homemade Pizza Bread
*If this is not the "Pizza Oven Grill" product you were looking for, you can check the other results by clicking this link

