Product Description
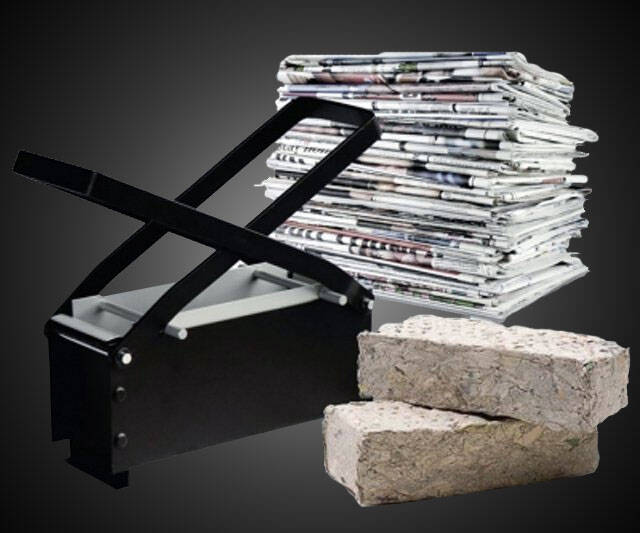
Look like less of a redneck burning your trash with this handy paper log maker. The deep metal box accepts newspapers, junk mail, cardboard, wood chips, and wrapping paper, but probably not Taco Bell bags because the... [Read more]Top Reviews
A review about the product, not expectationsby joel (5 out of 5 stars)
July 31, 2012
Hopefully I can shed more information on the product and answer any questions about expectations as well. Many of these reviews seem to focus on what the customer was expecting and do not fairly give the product as it works the review.
The Log maker itself is a pretty durable construction of all metal. It comes in 3 parts. The outside container with the handles, a removable bottom to pull the brick out, and the press part that compresses the brick. My setup came with instructions though it is actually pretty easy to figure out as well. Basically the thing works by taking shredded paper and compressing it to the point that it no longer burns rapidly but putting it into brick form. In that regard this thing works beautifully.
Now to answer other questions you may have.
You need to shred the paper! This is for a few reasons. It compresses better and also when the shredded paper is placed in water to soak (part of the instructions) it allows the water to attack the fibers of the paper and makes it easier to compress. Shredding the paper is probably the most annoying part to me. Sitting at a shredder sort of sucks waiting for it to shred paper. A Shredder bin about a foot and half tall makes about 3 bricks Ive found. It would be much better if I was in an office setting and could volunteer to take shredder waste home with me. Either way I recommend letting the paper shreds soak for about 3 days. It seems long yes, but planning ahead is always helpful. I have done as little as a day but those ones always seem to burn faster. Two days is fine if your in an absolute rush.
Make the bricks, this is as simple as placing the water soaked paper in the press and following the directions. Water will come to the top and out the sides and it has the potential to smell depending on the ink in the paper and other factors that went into making the paper. I typically compress the log maker then place it on the side so the water that came to the top can run out. Pull the brick out and let them dry.
As far as drying goes, I set them on a piece of wood so I can move them if necessary. Ill put them out in the sun and then move them because of shade that's created at certain times of the day. It also allows me to move them to the garage if rain is coming. I typically turn them completely once a day to make sure all the sides are drying at the same rate. If your in a rush, the over works perfectly fine too to accelerate the drying process.
After they are dry its a simple matter of placing them into the fire. You can use these completely void of wood. I actually use them in conjunction with wood, Ill use maybe a log of wood to every 3-4 bricks of paper. They are smokeless as long as you use just regular paper, but adding stuff will cause smoke.
When thinking about the stars to give this product, I think of the time it saves me of cutting up and chopping up wood. Of course I could just go buy firewood but that completely defeats the purpose of buying this paper brick maker in the first place.
**I would like to add that when making your bricks make sure your filling the log maker, the less space inside the more compressed and the more brick like they become. The bricks absolutely have to be dry as well. If there is any doubt to if they are dry, place them in the over for a bit. 400 on a non convection oven and maybe 350 on a convection oven, keep rotating them and you'll get really light paper bricks.
Does What It Says
by Amazon Customer (4 out of 5 stars)
May 26, 2013
I have had this paper log maker for about 2 months so I figure I can write a reasonably good review of it. Overall I am happy with the purchase. With the amount of time it takes to make a batch I don't know why anyone would buy the one that makes one at a time. It would take all freaking day trying to make them one at a time. Do yourself a favor and buy the four brick model.
Ignore anyone that says it does not work. It took me two batches to get it down just right so take your time. It does work but there are a few suggestions that make it work better.
First, Use shredded paper. If you try to just soak news paper or unshreded paper it will not stick together properly. Also, each batch will be a little different. Some will stick together better than others because of the different types of paper that might be mixed in.
Second, Buy a big plastic trashcan to soak it in and a small shovel. I have a 33 gallon can that I use. A half full 33 gallon can will make about 26 bricks. Also, the paper will smell bad. Some batches worse than others depending on what types of paper were used.
Third, Let the paper soak for minimum of 4 days. I let mine soak for about 5 - 7 days. The longer it soaks the better it will turn out.
Fourth, Use some type of boards to place the bricks on. This way you can move them indoors when it is going to rain.
Fifth, Be patient. It takes 3 - 5 days of full sun on average for the bricks to dry. You will have to turn the bricks every day to let the bottom side dry.
Sixth, Be prepared for a mess. The shredded paper will spill out the bottom and make a mess wherever you press the bricks.
Pros:
Bricks burn well
Easy to use
Solid construction
Cons:
Makes a huge mess
Most of the paper smells bad after soaking
Takes a long time to dry
Things that worked for me
by Jest54 (5 out of 5 stars)
December 5, 2012
I got this brick maker at the end of September, rainy weather in the Pacific Northwest. I use a paper shredder for all materials -- including cardboard boxes. I dump shreds into one of two 20 gallon rubbermaid containers on the deck and cover with water. I leave the shreds for about a week, then using a wide-mouthed kitty litter scoop I scoop the shreds in to the slots. It takes 5-6 scoops to fill each slot. I found the scoop makes it faster and easier and less messy than doing it with my hands. I use the same water for the next shreds. After I squeeze the water out of the bricks I put them at the base of my woodstove or on a rack in the garage where a dehumidifer runs. It takes about 6-7 days for the bricks to thoroughlly dry in these environments.
Before making the bricks I read all the reviews, hints and watched a video on YouTube. After a few tries, my bricks now are always solid, don't crumble and burn well. I could never make enough bricks to heat my home through winter, but I can supplement the wood with the bricks. I do believe that it's important that the paper shreds are really well saturated and have had time to break down. If I drizzle old candle drippings on the top, they make good fire starters too.
UPDATE: 12/11/12: Yesterday I decided to burn ONLY paper bricks since I had many and wanted to test their efficacy. The outside temperatures ranged from 39-46 degrees. I started a fire at 9am using 3 paper bricks, one with wax drizzling; the fire went all day till 11pm, when I went to bed, fire still going. I added 2-3 bricks an hour during the day, using up a total of 34 bricks. The house stayed at 66-69 degrees. I prefer the house a little warmer and think that combining wood and paper bricks is the way to go.
Now that I know how well they work, it makes me wonder how many I can make and store during the summer. I know I can get throw away newspapers and broken down cardboard from the stores for free. It will definitely lessen how much wood I use.
I am going to give several friends 3 bricks to try -- these bricks are great and once you get the hang of making good solid bricks, its the responsible thing to do.
a worthwhile investment
by Beth K (4 out of 5 stars)
October 14, 2012
i purchased this product to use in conjunction with firewood in our fireplace and outdoor fire pit. i wanted this to save money on buying wood and also to use up some of the paper that seems to accumulate around here instead of just throwing it in the recycling. My husband doesn't think it's worth "all the work" but honestly it isn't much work, just mostly requires patience, which he definitely lacks.
the product itself is good and pretty sturdy. it's not difficult to use or to press out much of the water, even if you don't have loads of upper body strength. the reason i knocked it down a star is because i didn't find that the instructions provided from the manufacturer really gave you a proper indication of how to make the logs. most of what i learned about making the logs i read about on other websites or watched on some you tube videos.
You really want to let the paper to soak in water for a while. i usually let the paper soak 3 to 5 days, stirring it daily. then i go out into the driveway to make them. it's a messy process, requiring the use of gloves. first i made them in our utility sink, but bits of paper got all over the sink and in the drain so I decided to go outside after that. the thing the instructions really don't tell you about is how long to dry them. it just says "let them dry" and leaves it at that. it takes WEEKS and weeks for these things to properly dry, and the colder it gets the longer this may take. the outside of the brick might look and feel dry but inside it's probably still damp. when you pick up the bricks they should be very light when they are totally dry.
Also, these do not burn like, say, a duraflame log or something. you can't just set it on fire and expect it to blaze up. they really do burn like a piece of wood about the same size and shape. you have to have a nice blaze going for them to catch or else it just sits there sadly smouldering and not looking very impressive. I believe they do work well as a supplement to firewood. I guess you could use them without firewood if you had other kindling to use with them. right now i don't have enough bricks on hand to use them alone. I look forward to making them all spring and summer next year and having a convenient stash set aside for next winter and fall.
newsprint bricks burn slower and longer than ones made from copy or printer paper. mine are usually a mix of both kinds. i have not tried adding leaves or twigs and stuff yet, but have some soaking now and will edit this review at a later date if i find they add anything worthwhile to the result.
Endless free supply of paper log material.
by Silas Longshot (5 out of 5 stars)
May 2, 2012
If you have the typical junk mail stuffing your mailbox, with it going right into the trash, you have a ready source for making paper logs with this gadget. Shred the paper, throw in some chipped twigs, leaves and yard clippings if you wish, soak thoroughly. Scoop the glop into the press, packing it firmly into the corners and right up to the top of the forming section. Put on the press part, squash the water out as much as possible. It seems to take a couple weeks in the sun to dry the logs out properly. Once fully dry (they will be very light and fairly solid)you get a couple hours burn time. Works best as a supplement to regular fire wood.
Bonfires, no. Stoves and fire starting, yes.
by John Scout (4 out of 5 stars)
May 31, 2016
I got this for some family members who were (at the time) constructing a resort/camp/getaway in the Appalachian area. I thought "hey, they'd sure love to reduce their waste, haul less trash somewhere, and cut down on the cost of wood fuel". For the most part, it did that. It was more durable than it first looked, and after a lot of use, one pin or bolt had to be replaced, but it was a common part which cost less than a dollar. The materials go in, get pressed, and then dry. It's a simple process. As far as heat output and fuel potential, the average "paper log" might be best for starting a fire, but not sustaining one, as it burns to quickly. However, for cold weather and keeping their Buck stove running inside their cabin, the logs work great, and that's where they get the most use. It's also worth noting that after a short time, the process gets messier with use, and can be conducted almost entirely indoors. The missing star is for the broken bolt, but it could've easily been user error. So for bonfires, no. For off-grid small fires, yes.
HORRIBLE construction & CHEAP materials-DO NOT BUY
by Patrick A. (1 out of 5 stars)
December 23, 2018
This is the first fire brick maker I have bought and was very disappointed in the quality. My paper was shredded paper that was well soaked and mixed with a paint mixer, and each batch was pressed carefully to make sure the top plate presses down evenly. Despite being careful the handles twisted and bent after only 3..THREE!!!..bricks. The problem is a combination of junk pressed Chinese sheet metal (box was very clearly labeled made in China), and the pivot screws where the handle attaches to the base have so much play in them that you would need another set of hands to squeeze the base of the handles in to make sure they hit the studs on the press plate and do not twist. Basically, they are garbage. Although the sides had not failed after the three bricks, they are just pop riveted together and were already showing signs that they would not be long for this world. I am in the process of modifying it with new handles I am making from more durable flat bar stock and have made a set of side braces out of angle iron with a large threaded rod to put compression on the sides and relieve the rivers of the main stress. I am pretty sure I will get this to work, but only because it was worth me turning into a project and I had the tools to do so. It won't be pretty, but should work. If you don't want to buy this as the start of a project piece then I do NOT recommend buying it since the materials and construction are absolutely NOT durable enough to do the job it is made to do. Please do NOT believe the 5 star reviews saying the bad reviews are people not knowing how to use it or what they were getting. Neither is the case for me and I will attest to this product being a flimsy toy that will absolutely not hold up to regular proper use.
Just what I expected
by potential customer (5 out of 5 stars)
September 29, 2014
This was recommended by a friend who is very into emergency preparedness. The product performs exactly as I anticipated that it would. I used shredded printer paper, shredded newspaper, and bits of egg crates. The egg crate pieces need to be torn very small. Of these three items, newsprint breaks down the best.
I soaked my paper for several days. I used an old shoe rack (the kind with poles stretching between the uprights) as a drying rack for the bricks. Two out of 20 in my first batch needed to be on a flat surface to dry, but the rest did just fine on the shoe rack. This allows air from all sides, so no turning is required for complete drying.
My friend stores his bricks in space bags and I plan to do likewise. This keeps the bricks dry and keeps the little bits of paper that fall off the bricks from making a mess.
NOTES:
1. This is a messy and gooey project. If this bothers you, then this might not be a project that you choose to do. The little bits of paper got caught up in the breeze, so there will be cleanup from that. The wet paper has a slimey feel that may bother some folks.
2. Actually forming the bricks takes just a couple of minutes each.
3. To make bricks that stick together, cram all of the paper bits possible into the brick former. Press down with your hands and add more. When you cannot get more into the mold, then use the press to remove as much water as possible. Trying to make smaller bricks by using less paper in the mold results in poorly formed and overly wet bricks.
4. To get the brick out of the form singlehandedly and without disturbing the brick form too much, pull one side out and then the other side out of the form. Trying to bring it up evenly, a bit at a time on one side and then the other, disturbs the form of the brick too much so it doesn't stick together very well.
For an entertaining time, read the very generic instructions that come with the product. ;)
works once fixed and modified
by Puck (3 out of 5 stars)
September 30, 2019
Item arrived with box in perfect condition. Opened it up to find both handles bent so bad they wouldn't close all the way or engage the pins on the press. when you first get it take the handles off, straighten them, and add washers as spacers between the handles and the screws so that they don't deflect so much. Quality control was out to lunch. After fixing it it does work pretty good. If you press it tight the sides are thin enough metal they bend outward from the pressure and it makes removing the "log" a real pita.
A great idea but needs some tweaking!
by jocelyn_92 (4 out of 5 stars)
January 5, 2016
This is such a great idea and I have seen videos of many people who made their own, which is what my husband wanted to do ... but I knew I would be waiting forever so I went ahead and ordered this. It is very simple to use, albeit messy. you do have to be somewhat careful not to overload it or it will bulge out at the sides. My major complaint is trying to get the brick out once it's made. The insert is pushed so tight up against the form that it takes quite a bit of effort to get it out, especially for someone with painful and stiff hands. They should make it with some kind of mechanism that pushes it out from the bottom... then it would definitely get 5 stars. What a great way to get rid of all the paper that tends to take over the house. It works best with shredded paper so you get a more compact brick, and you should let it soak a day or two to help break it down. I tried draining it into another bucket so I could reuse the water... but it gets pretty smelly!! A great way to SUPPLEMENT your wood supply while recycling all the paper waste.
*If this is not the "Paper Log Maker" product you were looking for, you can check the other results by clicking this link

