The Ultimate Arduino Starter Kit | ||||||||||
| ||||||||||
Product Description
This is the ultimate Arduino Uno Starter kit by Vilros . It has enough components to get you started making your own Arduino Projects.This kit includes a 72 page full color Instruction Manual giving you a full introduction to Arduino programming as well as step by step tutorials on how to use each component in this kit.
This Kit is recommended for the beginner interested in leaning the basics of Arduino programming as well as the expert in Programming. The kits has a value of $100 in components, that's over 40% in savings!.
Once you've gone through the instruction guide and mastered the basics of each component go ahead and make your own project combing one or many components.
With this kit you will learn what Arduino is all about and how it is used.
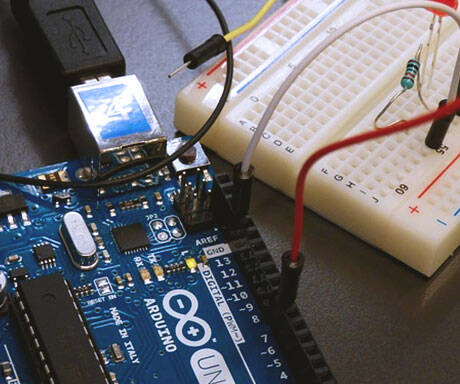
You will learn the basics of Electrical Circuits.The manual will also explain what a bread boards is and how its used.
Arduino is based on C/C++ programming language so we will walk you through the basics to get you started.
Kit Content
1X Arduino Uno R3
1X Arduino & Breadboard Holder
1X Bread Board
1X Shift Register
2X P2N2222A Transistors
2X 1N4148 Diodes
1X DC Motor with wires
1X Small Servo
1X 5V Relay
1X TMP36 Temp Sensor
1X 6' USB Cable
65X Jumper Wires
1X Photocell
1X Tri-color LED
10X Red LED
10X yellow LED
1X 10K Trimpot
1X Piezo Buzzer
2X Big 12mm Buttons
45X 330 Resistors
45X 10K Resistors
Features
- Complete Arduino Uno R3 Starter Kit for Beginners: Kickstart your electronics projects with the Vilros Arduino Uno R3 kit. Includes over 190 components such as Arduino Uno, breadboard, jumper wires, DC motor, servo, and relay. Perfect for beginners and electronics enthusiasts. Great electronics kit for learning circuit fundamentals.
- Comprehensive Instruction Manual for Easy Learning: The 72-page full-color instruction manual guides you step-by-step in mastering Arduino programming, perfect for both beginners and experts. Learn the basics of Arduino Uno and electronic circuits, and how to use each component effectively in your own projects.
- 190+ Electronics Components for Multiple Projects: With over 190 components like resistors, LEDs, transistors, and more, this kit gives you everything you need to build Arduino circuits and projects. From jumper wires to breadboard holders, you’re all set for creating your own innovations in electronics.
- Value-Packed with $100+ of Components: Save more than 40%! This Arduino starter kit includes a wide variety of components valued over $100. Whether you're a beginner or experienced user, this kit offers exceptional value, providing everything needed for Arduino Uno and electronics accessories & supplies.
- Versatile & Compatible with Other Kits: In addition to being perfect for Arduino Uno R3 projects, this kit is compatible with Raspberry Pi and other electronics tool kits. Learn to integrate components into various DIY projects and explore endless possibilities in Arduino programming and electronics.

Top Reviews
Buy a kit and give it to a 12 year old !by Johnny L (5 out of 5 stars)
October 15, 2014
I am a 71 year old man, been in electronics a fair amount of my working career and started programming with the original Apple, Commodore and TRS-80 computers and then made some of my living programming.
I can not comprehend where I might have been able to go had I had a kit such as this Arduino USK when I was a kid. I purchased the kit to use in Amateur Radio applications but who knows where this all may lead.
Thanks for the opportunity to keep busy in my retirement, I think that this kit should be used in schools to not only teach basic electronics but also reading, math and most importantly, how to follow instructions.
Buy a kit and give it to a 12 year old.
A bit pricey, but a decent kit for starting out.
by Brian R (3 out of 5 stars)
February 21, 2014
You can probably get an Arduino starter kit a little less expensively if you look around here on Amazon or at that auction site.
The Uno looks to be genuine, although it's fairly tough to tell these days, and Vilros is not an official distributor listed on the Ardiono site. It does behave as an Uno and sketches behave normally upon it. The breadboard in the kit is standard fare, but on the cheaper side. Components are all as expected (tough to screw up LED's and hook-up wire!). The "72 page guide" has 12 project in it which are well documented, but no code in the book, so the zip file with the project code needs to be downloaded adding extra steps to getting started. It's also worth noting that some of the projects just won't work as they're laid out in the book when powering (and programming) the Uno by USB; any of the projects that involve the servo or motor draw more power than is supplied to the Uno's 5v rail, and while it doesn't damage anything, nothing happens either. You're left scratching your head as to why the project isn't working. Plug a 9v battery into the supplied barrel plug pigtail, and things start working okay, but the Uno needed to be completely shut down in between sketch uploads, otherwise the IDE throws errors. Again, all technically "works", but not as simply as described in the "guide".
NOTE: This kit is marked up about ten bills for the additional LCD included over then next kit down sold by Vilros. The LCD is sold on Amazon for about ten bucks (much cheaper elsewhere), but isn't the nicest thing to work with, as it takes a bunch of pins to work. There included book doesn't include an example for the LCD, but rather instruct you to go to their website, create an account, and view an example. Their example is a copy/paste of someone elses work, and is poorly documented. These types of LCD's are readily available, and are often used in products, but it might be wise to spend just a few more dollars and get an I2c or other SPI compatible LCD for tinkering, as it'll only use a few pins and are often even easier to code.
All in all, not a "bad" kit, and the guide will give some good ideas starting out, but it's spendy, and the upcharge for the LCD isn't really worth it.
Fine starting kit, but could improve teaching
by Nexus Dude (4 out of 5 stars)
January 22, 2016
For each of the 12 circuits it shows how to create, the booklet provides:
* A formal circuit diagram
* List of parts used
* 3D and 2D diagrams, showing the finished breadboard / Arduino
* Table of component used (e.g., a 330 ohm resistor), and which breadboard positions to use.
* Short discussion of C code used in the IDE
* Expected results
* Short troubleshooting section
* Very brief example of a real-world application
In the booklet, what we don't see much of:
* Thorough teaching of electronics, troubleshooting, etc.
* Instruction on the meaning of the circuit diagram.
* Instruction in WHY those components are used. Why is a resistor needed? Why is it a 10K ohm, and not a 330 ohm? When do you need a transistor or capacitor (the kit includes no capacitors). Note: there is some discussion of pull-up resistors.
* A diagram showing how the current flows through the breadboard (be sure to read the section "How's it all connected" on the page titled Breadboard -- and WHY aren't there any page numbers???)
The result is that if you make a mistake in a circuit, you may have difficulty correcting it. If you want to create a new circuit of your own, you probably won't have the knowledge to do that.
To be fair, there is some teaching in the *.ino code provided for each circuit. It's not all in the booklet. So, you definitely want to read the C code and comments. There are no quizzes, nor code to complete, or anything like that. It's all basically done for you. There could be far better explanation of what resistors, transistors, capacitors, diodes, etc. do. If you somehow learn to create your own circuits, it's going to be on you, or YouTube, or somewhere else.
It includes a Made in USA, Arduino (genuine, not clone, derivative or, I think, counterfeit), which helps support the Arduino community.
It does include a parts list of the entire kit, near the start of the booklet, so ignore the reviewer who said there isn't.
Some sensors that would have been cool to include, but weren't:
* Motion
* Humidity
* Air quality
You can, of course, purchase these cheaply elsewhere, and use with this kit.
The English is good throughout.
The 12 circuits are:
1. Blinking an LED, similar to Blinky.
2. Potentiometer (using a dial to vary LED brightness)
3. RGB LED
4. Multiple LEDs
5. Push buttons
6. Photo resistor (like to control a night light that gets brighter when it gets dark)
7. Temperature sensor (it's not a very accurate sensor)
8. Single Servo (that you would use to grasp things in robot hands, for example)
9. Buzzer
10. Spinning a Motor ** Note: I got a bad motor, apparently. My circuit perfectly matches the book. I tried other parts (diode, 330 ohm resistor, transistor, even wires). The code uploads. I entered various motor speeds in the Serial Monitor, which the booklet never mentions is needed. All the motor does is a high-pitched hum. **
11. Relays (to turn things off and on)
12. Shift register
The adult hobbyist's "Legos"
by Charles (4 out of 5 stars)
July 6, 2015
Background: 20 year old college chemistry student, one computer science class taken.
I love working with the Arduino, tinkering and learning while having fun and feeling "in control" too. As far as the aesthetics, I'm not a big fan of the base that is provided. Plastic, black, and advertising "Vilros" in big letters. I threw it away and built my arduino into a nice dark block of wood instead! I give it 4/5 because there are minor issues when you buy an Arduino brand Microprocessor from a company that isn't Arduino. The manual and the computer files didn't match up 100% because of this, but all that required was for me to Google "USK Guide Code" and download the codes for the tutorials. So the crisis was averted but nonetheless the Arduino and all of the parts are wonderful. I am not very experienced with computer science, I took a one month class is all. I was able to get the hang of it pretty quickly! Overall, this purchase was worth it 100%. I'd recommend this to anyone who wants a hobby or especially people like me, a young adult who wants to beef up his brain for a stronger resume and more diverse skill set!
It works (but a few pitfalls to be aware of, and which can be resolved). And the price is right.
by Peter A. Herrmann (3 out of 5 stars)
March 20, 2019
I've done Circuits 1 through 11 (will soon try the last), and eight worked fine. Two (#6 and #10) needed 'adjusting' to get to work. I'll elaborate below. #11 isn't working yet. More below, A major problem is that the theory is (mostly) unexplained. Another big problem is the total carelessness in editing of the Guide. Circuit #11 is a prime example: the table of components and connections doesn't even agree with the actual diagram. In many particulars. Another problem is that the circuits aren't always the most efficient: there are some completely unnecessary connection, or connections that could have been designed more simply.
I remembered enough High School electronics from 60 years ago to figure out circuits 1 through 9 by myself. For Circuit 10 - which introduces a transistor and a diode - I couldn't remember (although I do know we covered both topics), so will have to dig some on the Internet. Below are two minor problem circuits that I was able to resolve, followed by #11 that I haven't yet resolved (and which might not be resolvable - see below).
Circuit#6:
The voltage divider as per instructions has the fixed resistor at top and sensor (photo) resistor at bottom: so that high light gives zero voltage, low light gives max voltage. Must be reversed/corrected by either a code fix:
1) change the analogWrite(ledPin, lightLevel); into analogWrite(ledPin, 255-lightLevel);
or a wiring fix:
2) connect photo sensor to f1-f2 with 10KOhm resistor between I2-I6 and
sensor pin A0 connected to J2 (w/o any change to the code)
Circuit#10
The transistor picture - as shown inserted in pins A1,A2,A3 - is backwards (i.e. shows the flat side facing column B of breadboard). Should be turned around: curved side facing column B); in other words A3,A2,A1. Without correct positioning the motor will not spin.
I'm actually glad these problems occurred: forced me to really look closely at both code and circuitry.
Circuit #11:
As with circuit #10, the transistor is shown backwards. Also the diode is connected backwards in the diagram. And for the components/image reference the diode entry is totally wrong (along with 3 of the other entries). Only after correcting the transistor and diode orientation could I begin to hear the relay coil clicking every second.. But no current is coming out of the relay switch. Possibly the switch is broken. Not 100% sure yet. The relay switch actually has 5 pins - but the components reference and diagram only enumerate 4 pins - and you need to bend the 5th pin to get it to fit the appropriate breadboard slot (which connection isn't even shown in the guide). Very sloppy editing/proofreading (if it even was).
Also, I see that different reviewers have had other problems - that I didn't have - so perhaps the quality/standard of the components is not consistent. But maybe the manufacturer has since resolved that issue (I received my kit in March, 2019. I didn't notice when the other reviews - with problems described - were posted. ) All in all, this is a half-decent, inexpensive educational tool: can motivate a person to learn circuits AND computer coding if they haven't already (or to re-learn if they've forgotten). I originally gave this a 4-star rating, but after the problems with circuit#11
described above, I've downgraded the rating to 3-stars.
The Good: 1) Genuine Arduino board
by tinker (5 out of 5 stars)
May 21, 2015
Regarding Vilros and this Kit :
The Good:
1) Genuine Arduino board, very well put together.
2) The documentation is fantastic for both the hardware and software side. Very good for beginners.
3) the parts included seem to generally be of good quality,
specifically: nice thick USB cable, good breadboard, jumpers, servo, DC motor is beefy.
4) once downloaded, the examples Vilros includes are very well written and documented.
5) The whole think is packaged really well
The less-than-good: (if you can call these that.)
1) You need to register with Vilros to download the examples. Not a big deal, actually, just name and email and they haven't spammed me yet. That said, you don't need the examples to get going. The examples supplied from Arduino and the book that comes from Adriuno are sufficient.
2) The leads on the DC motor are flimsy and needs to be re-soldered, but geez... I'm getting REALLY nitpicky here.
Regarding Arduino :
1) the IDE you'll want to download from their site installed flawlessly
2) That IDE is easy to use, and It's free (but give them a small a contribution.)
3) the examples they included with the IDE are copious.
My 10 year old son and I are working on this together, He already has an idea for his first project.
...pleased as punch! This is the best purchase I've made all year.
This is an excellent kit for Arduino beginners
by critique (5 out of 5 stars)
September 4, 2016
This is an excellent kit for Arduino beginners. The manual is a stand-out feature of the kit - very clear, detailed and helpful for those who lack background in electronics. Little is left to chance by providing comprehensive multiple depictions of each of the 12 project circuits. Including not only realistic 2D (Arduino/breadboard plan views) and 3D drawings of the circuit layouts but also abstract circuit diagrams is a great feature.
The connections that the user needs to make between components both on the breadboard and to the Arduino itself are set out systematically and comprehensively in a table that allows the user to wire up the circuits in an almost foolproof way. There are one or two mistakes amongst the tables but these can be identified by reference to the other depictions provided. Conscientiously going back and forth between the different types of information given for each project can actually help with understanding the relevant circuit diagram.
For all its advantages, the manual does have a few errors - the project 6 (photoresistor) arduino/breadboard plan shows wrong power connections and the project 11 (relays) plan shows wrong both wrong orientation of the transistor and the diode. These mistakes were frustrating, especially in the case of the relay project where I initially thought the supplied relay was faulty (and only discovered the errors after testing the relay to establish it was OK). Surely Vilros could supply an 'errata' with the booklet to save their customers from this negative experience.
Unlike some other Arduino manuals are no complete sketches given in the Vilros manual. This helps to keep their manual brief and approachable. The sketches themselves must be downloaded but are well documented with comments to help the user understand what is going on. I found it useful to print the sketches off then go through them in detail to determine how they worked. The manual gives just enough 'flavour' of what the sketches are doing without becoming bogged down in all the minutia - I thought this balance worked very well.
The programming ideas covered in the 12 projects are quite wide ranging and well-chosen to provide a gentle introduction to the scope of what will be later met in more complex Arduino sketches. Having worked through all the projects, I felt well prepared to join the wider Arduino community and tackle projects of my own.
A great Kit! Can't say enough good about it.
by T. McL. (5 out of 5 stars)
September 28, 2016
This is a perfect set! I bought it for myself to have a refresher with electronics and play with Arduino. Within a week, my 7 year old is making his own circuits from the user guide(he had never touched circuits before). The guide is really easy to follow and starts at an easy level. The sample code is really well documented. I am going have to get another one as now my 6 year old wants to play too! Having their names come up on the LCD was like xmas! :)
They cover the majority of basics, i do wish there were some capacitors and a couple more different resistors in the kit. (Not a complaint at all, but suggestion)
Great Arduino starter kit
by Millvalleyted (5 out of 5 stars)
January 8, 2015
I wanted to get more into electronics, and countless people recommended that I get an Arduino Uno starter kit. After looking around a while, I decided on this kit as it was inexpensive at the time, included everything I needed, and seemed to have enough extra components so I could get my feet wet into the world of electronics.
This kit has been exactly what I wanted. I did not use the booklet much. It seems to be oriented towards a young audience, and does not cover the coding aspect of using an Arduino at all. The diagrams are easy to understand, and even if you don't there's a wealth of informational material online.
The components in the kit helped me start with a few simple components in order to spark my imagination. Now, only a few months after buying the kit, I have made a flash trigger device that is used for high-speed photography to cause a camera flash to go off when a laser has been crossed. I now have many more electrical components (thanks to amazon) and can't wait to keep building interesting and high-tech devices. If you're technically savvy and want to get your feet wet into the world of electronics and Arduino, or if you just want to plug in some colorful wires and make lights flash and motors turn then I recommend you buy this kit or one like it.
Excellent start for beginners
by Glenn McFarlin (5 out of 5 stars)
January 14, 2016
As some one brand new to Arduino, I am really enjoying the step-by-step, almost foolproof experiments in this kit. They walk you through gradually advancing concepts with easy to read instructions and clear illustrations.
A couple of notes:
Study the content of the sketches (code) closely and keep notes. Understand what makes each work before you move on to the next. Useful snippets can be copy/pasted to a text file for later use. Grow your own library of useful sketches, in addition to those already provided with the Uno and this kit.
If an experiment offers you a more advanced concept challenge at the end of it (as many do), do some online research and see if you can find something similar that had already been done. Study their code and see how you can incorporate it to meet the challenge.
Example: One experiment has you connect a temperature sensor then display the readings in a terminal window on your PC. At the end, it challenges you to wire an LED that lights when a certain temperature (set by you) is reached. In a short time, with a little digging online and some reference back to previous experiments, I had not one, but two LEDs lighting at different temperature levels (child's play for someone experienced, man on the moon for this noob). Results were added to my growing library of sketches for later use.
Get a multi-compartment storage box to sort and keep track of all the components. As you add more later (and you will) they will all be in one handy location.
Finally, mount the Arduino on the base first, then verify the orientation of the breadboard (the square with all the holes in it) to the Arduino before you stick it to the base (follow the pictures in the book). Mounting it backwards with cause you to have to use longer wires to reach the Arduino, or use different holes on the breadboard than what the instructions tell you.
Customers Who Bought This Item Also Bought
- Arduino Programming in 24 Hours, Sams Teach Yourself
- Exploring Arduino: Tools and Techniques for Engineering Wizardry
- Programming Arduino: Getting Started with Sketches, Second Edition (Tab)
- Getting Started with Arduino: The Open Source Electronics Prototyping Platform (Make)
- Pre-Formed 140-piece Jumper Wire Kit
- Elegoo EL-CP-004 120pcs Multicolored Dupont Wire 40pin Male to Female, 40pin Male to Male, 40pin Female to Female Breadboard Jumper Wires Ribbon Cables Kit for arduino
- ELEGOO Upgraded 37 in 1 Sensor Modules Kit with Tutorial Compatible with Arduino IDE UNO R3 MEGA2560 Nano
- 9V 1.5A Power Adapter, for Arduino UNO R3, Router, Kitchen Scale, Schwinn Bike, Exercise Elliptical Recumbent Upright Trainer, Crosley Cruiser Record Player, Power Supply, 6 FT Cable, UL Listed
- DaFuRui 2Pcs SG90 Micro Servo Motor Mini 9G Compatible for Arduino RC Robot Helicopter Airplane Boat Controls
- 4Pcs SG90 9g Micro Servos for RC Robot Helicopter Airplane Controls Car Boat
- Vilros Uno Ultimate + Ethernet Starter Kit - Includes 72 Page Instruction Book
- Vilros Arduino Uno Ultimate Starter Kit + LCD Module - Includes 72 Page Instruction Book
*If this is not the "The Ultimate Arduino Starter Kit" product you were looking for, you can check the other results by clicking this link