TV-B-Gone Kit | |||||||||
| |||||||||
Product Description
Tired of all those LCD TVs everywhere? Want a break from advertisements while you're trying to eat? Want to zap screens from across the street? The TV-B-Gone kit is what you need! This ultra-high-power, open source kit version of the popular TV-B-Gone is fun to make and even more fun to use. This version can be used in both \"North American/Asia\" as well as \"Europe/UK\" areas (basically, the whole world)! This kit comes unassembled with all parts necessary. Tools and batteries are not included. Warning: This product contains small components and requires assembly. Assembling this product incorrectly or misusing a soldering iron may cause personal injury or property damage. This product is not for children. Small components in the product pose a chocking hazard to children.Features
- This kit allows you to turn of any TV with the click of a button.
- Open source kit version of the popular TV-B-Gone is fun to make and even more fun to use.
- Tools and batteries not included.
- Assembly is required. (Medium Soldering Skill Needed)
- Warning: This product contains small components and requires assembly.
Top Reviews
Delightful electronics kit - but it's hard to keep a straight face when using itby A customer in Seattle (5 out of 5 stars)
December 21, 2013
This kit takes about an hour to assemble (you'll need a soldering iron, some solder, and diagonal cutters to clip off the excess wires from the electronic components). The kit comes with a printed circuit board and all necessary components, but no instructions at all -- instead, the outside of the package lists the address of a web site that has excellent step-by-step instructions. I built lots of Heathkits as a kid, but I'd guess that even if you have never soldered before, you could build this thing successfully.
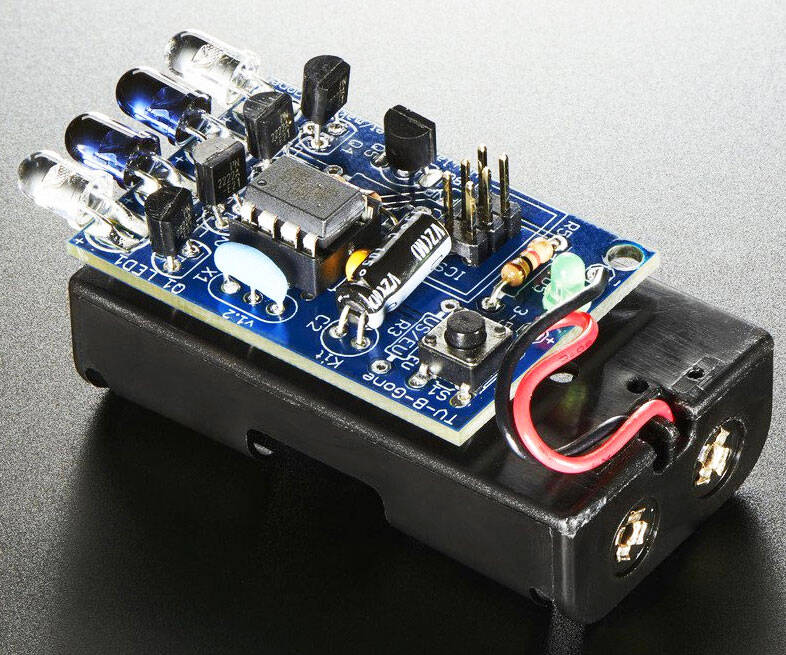
As you can see from the photo, this device is anything but inconspicuous, and the flashing green light only makes it stand out more. It could be concealed nicely in an Altoids box or a cigarette pack -- I think I am going to give that a try (I'll cut holes to let the LEDs poke out).
I can't quite convey the feeling you will get when you use it. I first tried it at a local sports bar. I stood outside on the sidewalk, pointed it through the window at the TV, and voila! After a second or two, the TV turned off. The next "victim" was a neighbor who was on the phone in her living room. Her TV was off -- or let's say it was off until I walked by, pointed this device through the window, and turned it on. Then I pressed it again to turn the TV off. I can't imagine what she thought was happening.
Call me immature (and you'd be right), but I bet you too will have a hard time keeping from laughing when you use this thing. This kit would be a great stocking stuffer for the nerd hobbyist in your life. Someone who does not want to build the kit should consider one of the keychain models also for sale on amazon.com.
Such bad fun!
by Chris D. Faulk (5 out of 5 stars)
March 14, 2015
I can't even begin to describe the feeling you will get the first time you turn off a TV with this thing!
Let me begin by saying my career has been industrial electronics repair...so I could assemble this thing in a coma. Having said that, my 12yr old soldered this thing together in less than an hour with ZERO previous soldering experience. It's really that easy.
When I inserted the batteries into the holder, my living room TV shut down within a few seconds. I was far across the room and facing the other way! I have tested on multiple individual TV's and haven't found one it won't turn off yet. I pointed it into a closed office last night and a TV around a corner I couldn't even see and it turned off through the glass door.
We are going to Buffalo Wild Wings tonight...I simply can not wait to see the reactions. I've made sure and picked a busy night with an important event that will be playing.
Great little prank device.
by Dmitry Searle (5 out of 5 stars)
July 8, 2019
I purchased this in order to prank people with TVs. This takes a little bit of soldering skill to assemble. The only complaint I would have is that it takes a few seconds longer than I want to turn a TV off, but I understand it cycles through a list of signals to work. I have been successful in turning all the TVs off in an Apple Bees during a big football game and the reaction of all the people watching as well as the serving staff is priceless. You do have to be somewhat careful because regular cameras will be able to see the IR flashing. Otherwise this device is really fun and I highly recommend it.
Super fun and easy to build (if you know about electronic kits)
by Jake Cozart (5 out of 5 stars)
January 6, 2018
This was an extremely fun project and is a great little Gizmo for pranks (or to turn off annoying tvs in public).
For everyone on here saying the power switch is defective. It is not a power switch but rather a button to start the sequence. The device is always powered and goes into sleep mode. If you want a switch then you can install one between the batter leads.
With that being said if you know what you are doing it's rather easy to put together and super fun to use. This would also make a great physics project.
A caution to everyone wanting an easy project: If you are are new to electronics this is not the kit for you. It doesn't come with instructions and can be a bit confusing to put together if you don't know what the components are and do.
Loads of fun!
by John K. (5 out of 5 stars)
September 24, 2017
I can't remember the last time I had to solder anything, and even then, I had this kit together and working in under 15min. Anyone with basic electronics / soldering skill can get this done without even needing the technical schematics or instructions. The product itself is loads of fun to use, and seems to work on just about any TV you point it at. Most turn off within a second or two, but the older or more obscure models may take a little more time. It also has a good amount of range, so you can cause havoc from a "safe range." It's not the smallest device of its kind, but it will comfortably fit within the palm of your hand for discrete operation.
Fun kit to build!
by L. Dobie (5 out of 5 stars)
October 13, 2017
This works as advertised! I may or may not have purchased this on a whim after getting tired of hearing a neighbor's TV and weekly UFC Pay-Per View parties. They may or may not have placed a television and surround sound in the backyard adjacent to mine, and may or may not frequently have "guests" over to hoot and holler/scream at the television until 2 am some nights. They may or may not believe now that the TV is broken from being hung outdoors for the past 10 months. Despite my best neighborly efforts to ask them to please be considerate of those that live within 50 feet of them, this only resulted in them noting that they're not loud ever. So anyways I figured I'd try this little guy.
I searched for such an item on Amazon and ordered this after skimming the description at 130 AM after being awoken once again. Placed the order and was kind of surprised to get just a bag of parts. Went back and read the description again. Yep. Bag of parts. No worries though. Despite never building anything like this before, I broke out my soldering iron that I use for car audio work. About 45 minutes later I put in the batteries and pressed the button. My TV switched on after a few seconds. Pressing the button again shut it off.
It was kind of fun to build and even better to get the results intended. I've tested it from a distance of about 75 feet away and it works great.
Awesome kit, just be aware of polarity, time of soldering iron on transistors, and resistor location
by Nick (5 out of 5 stars)
March 26, 2019
It works! Just hit the switch so it comes out of sleep mode, hit it again (it will pulse faster for a short time), and wait as it cycles through the many TV codes from it's memory. It will turn most TVs on or off within a minute or less.
About soldering: It's an awesome kit, just be careful with a few things... First and foremost, pay attention to capacitor, LED, and IC / socket polarity: these will be marked on the part and board, and general info can be found by searching the internet. Also take note of the final resistor placement: it is a single resistor that should be soldered in the space next to the switch but in front of the small green LED, NOT the US/EU resistor space (which should remain unpopulated for US and similar kits). If you get the single resistor placement wrong, the unit won't turn on and the LED won't blink.
During soldering it is good to place things in some kind of order that will dissipate heat, be careful not to bridge pads / gaps / any exposed traces with solder, and use a thinner / lower temperature solder... no copper pipe solder and 1000W monster soldering iron from the '50s needed here (yes, they actually exist... scary). A simple thin silver bearing, low temp solder with a standard 15W - 20W iron will do the job.
I soldered components in the following in order; resistors, switch, capacitors, the IC socket, LEDs, and finally the transistors and battery connections. I left the transistor leads long for a while (about 5-7 minutes) after soldering them so they do not overheat and not function, then I clipped them close to the board with what some call a "nippy tool". I'm not sure of it's proper name, but it's sort of like a pair of short needle nose pliers combined with wire cutters that angle off close to one side.
You also might want to get an old tooth brush and 90% isopropyl rubbing alcohol to pour on the board and scrub off any rosin from the bottom side afterwards. You won't have to do this unless you want a very clean board or the rosin makes a yellowish mess all over the soldered area. If you choose to do this, do not rinse the board with water afterwards... instead rinse it with a little more rubbing alcohol and allow it to dry for about an hour. Sometimes you will have to wipe it dry with a paper towel or similar and wait a little or use a hair dryer on low setting for a few minutes and allow the board to sit for about a half hour before powering it up. But again, this is not always necessary. Remember not to use that tooth brush on your teeth ever again.
*about the IR LEDs: carefully insert them partially into the holes and bend them at an angle, then slightly bend the leads in opposite directions to hold them in place during soldering. You can then solder them at the top or bottom first, finishing on the other side or just touching the board and lead long enough for the solder to go towards the other side of the board. Their positioning should appear as they are in the sellers or my picture when finished.
Mischievous fun for the whole family
by Paul G. Atlanta (5 out of 5 stars)
December 17, 2017
I've had so much fun with this little device. I bought it to brush up on my soldering skills before attempting an intricate build.
Easy to build, instructions were fine, could have been better, but once I got the "flow" of them it was a breeze.
Fits in your pocket, and can be used and aimed without looking at it.
Only negative I have is not something that can improved upon and that is that it has to cycle through all known codes, and that can take a few seconds to a minute to actually turn the TV in question off. First time I used it, I thought I'd built it wrong because nothing happened at first, then about 5 seconds later, all the TV's in the place that were facing me turned off. Talking about 15 televisions. I nearly choked on my beverage.
The immediate uproar of half the people in the crowd made it worth it. If you do it during a big game for best results try to time it during a critical play and don't get caught doing it unless you want a whooping.
TV-B-Gone is Lots-O-Fun and Easy to Build
by Radio Telegrapher (5 out of 5 stars)
February 25, 2016
I always wanted a TV-B-Gone, so I finally decided to pull the trigger. The kit comes in a small anti-static bag. It doesn't come with instructions, but I downloaded a PDF file to assemble the kit. All the parts were present and accounted for.
It's a tiny PCB, so you may want to invest in a magnifier. It's uses through-the-hole components (no SMT) with a low parts count. It took about an hour to build taking a leisurely pace and it works perfectly on the three TVs I tested. I'm looking forward to wreaking havoc on noisy restaurant TVs and terrorizing my neighbors. ;-)
I think I'm going to mount (disguise) it in an Altoids tin. In order to make it fit properly, I'll have to switch from AA to AAA batteries. The AA batteries are a little too thick.
It works and on modern TVs!
by Robert (5 out of 5 stars)
June 23, 2018
I was skeptical, but this little ATiny Chip is jam packed full of current TV code. I was afraid it would only work on older CRTs from the 80s or something but nope, I soldered the last connection, popped in the batteries and turned off my TV (hey, I was watching that :( lol). I surface mounted my LEDs for easy removal because I have bigger plans for this thing *coughTTLmodulatedIRlasercough*. Anyways. I made a little diagram if anyone can use it to help them assemble this thing. It's super easy to assemble, took me 15 minutes at most. This is a great kit for learning to solder. very low parts count, just need to mind the polarity of the 220uf cap, the LEDs, battery holder, transistors, and most importantly, the little 8 prong chip has a little dot in the corner, that's pin 1 and must face the upper right hand corner respectively to the text as reference. In my pic I put some beefier 2n2222A NPN transistors to the IR LED biasing. The kit didn't come with those, I put those in to handle the experimental abuse I'm going to put this though. lol. Now R2 on the circuit seems to be a pull down resistor for using MOSFETs instead of transistors. I'm still using transistors but I installed it anyways to insure no collector to base leakage when I start messing with higher current IR emitters. Anyways, surely you guessed by now I'm an Electrical Engineer and I can say this device works. The stock IRs are very bright too and have an excellent range.
Customers Who Bought This Item Also Bought
- Velleman, Inc - Super Stereo Ear MiniKit MK136 - Entry Level Audio Amplifier Soldering Project
- Elenco FM Radio Kit
- Icstation 6-Digital Clock DIY Electronic Soldering Kit Student Practice Project STC11F02E Maser Chip PCB Board Learing Kits
- Oscilloscope Kit, KKmoon DSO138 2.4" TFT Handheld Pocket-size Digital Oscilloscope Kit DIY Parts SMD Soldered Electronic Learning Set 1Msps
- WHDTS 4-Digit Digital Clock Kits with PCB for Soldering Practice Learning Electronics with English Instructions
- Gikfun Upgraded USB Mini Amplifier Electronic Transparent Stereo Speaker Box Sound Amplifier DIY Kit for Arduino EK1918
- DIY Soldering Project Game Kit Retro Classic Electronic Soldering Kit, Tetris/Snakes/Race Cars/Space Invaders/Slot Machine with Clear Acrylic Case
- 2 Pack Simple Flashlight DIY Kit Module for Soldering Electronics Practice Funny DIY Soldering Practice Kit for Beginner
- AM FM Radio Kit Soldering Project Kit for Learning Practicing Teaching Electronics by VOGURTIME, New Version
- 2 Pack WHDTS DIY Electronic 16 Music Sound Box DIY Kit Module Soldering Practice Learning Kits for Arduino
*If this is not the "TV-B-Gone Kit" product you were looking for, you can check the other results by clicking this link


