Professional Smartphone Camera Lens | |||||||||||
| |||||||||||
Product Description
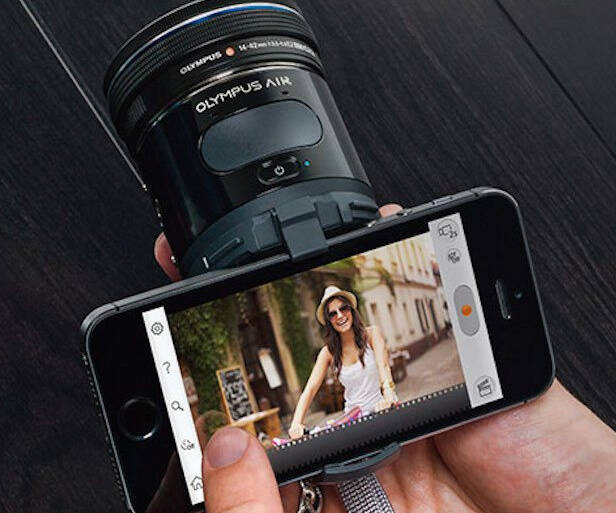
Instantly turn your smartphone into the professional quality camera you've always wanted using this specialized camera lens. The lens easily attaches to ... [Read more]Features
- SLR image quality, compatible with Micro Four Third lenses
- Instant Connection and image sharing via Bluetooth and Wi-Fi connection
- Comprehensive OA Central app with six different shooting applications
Top Reviews
A Review for Smartphone Usersby Chipp Walters (5 out of 5 stars)
July 25, 2015
Review of the Olympus AIR A01
The short of it: So far so good. Nice camera but very rough first time customer experience. I searched far and wide on the Internet for information on how to operate this, and found very little. So, after hours of trial and error, I think I finally got things figured out. And that's why I write this review-- so others don't have to go through the miserable customer journey I've had.
First thing. I am NOT a photography expert. I know only a very little about photography, some things like what an F-stop is, but not much more. This review is NOT specifically for photography experts, but rather for those who enjoy using their smartphone camera and want to move up to a more professional quality solution.
I should also mention I use an iPhone 6 plus, so this review will be from the viewpoint an iPhone user using the AIR iPhone app and iOS.
I do own a Panasonic Lumix DMC-G5. It's what they call "mirrorless" which means it's an all electronic shutter, not mechanical. It's considered a high quality camera, uses interchangeable lenses and takes excellent shots; it's just not a traditional SLR. As such, it's smaller and uses "Micro Four Thirds" lenses. These lenses are very high quality, and in fact can be as expensive as their larger SLR counterparts. I purchased my Lumix camera along with an Olympus MSC ED M. 60mm f/2.8 Lens for close ups of my saltwater aquarium. It's also a great portrait lens.
I thought I might spend some time outside with the Lumix but learned I'm just not the guy to haul around a camera bag everywhere I go. So, when I saw the Olympus AIR reviews, mostly good ones by professional photographers, I thought it might just fit my more casual photography style; plus I could use it with the other 2 lenses I had for the Lumix. So, I pre-ordered it and received it a day ago.
The "first time customer experience" is not a particularly good one-- especially if you're not a seasoned photographer. First off, it doesn't come with a micro SD card, and it won't work without one. So, after unpacking, I had to run down to Best Buy and pick one up. So, don't forget to buy one if/when you decide to purchase it.
Next, there's really very little documentation on how it works. Practically NONE. As mentioned, I have an iPhone 6 plus and the first thing I had to do was download their OA.Central App. It did a pretty good job of walking me through the very first steps, but there are a couple of real problems getting started. It's pretty easy to remove the AIR coupling via the instructions, but removing the AIR rear cover (underneath the coupling) was an interesting challenge. There are no indications or instructions on how to do this. You need to find a tiny slot on the outside rim of the cover, and put your fingernail in it, then carefully pry up. Once up, gently slide your fingernail around and under the cover until it 'pops' off. It's a delicate piece and appears it could easily break, so be careful. Took me some time to figure it out.
Putting in the micro SD card wasn't too hard, but there's not a 'click' or anything like regular sized cards. Next, I replaced the back cover then tried to figure out how best to put the AIR coupling (which holds the iPhone) back on-- which can be a real challenge. It turns out it can go on 90 degrees WRONG, which has the display confused so landscape is displayed in the portrait configuration and vice-versa. It's important the TOP LATCH of the coupling (with the oversized latch) align with the shutter button on top of the camera itself. There's also a little dot on the BOTTOM of the camera which lines up with one on the BOTTOM of the coupling which can help you to align things. Once done, you'll need to flip open the coupling and flip the LARGE or SMALL switch to your phone size. You may need to use LARGE for smaller phones if you plan on using your iPhone with it's protective case intact.
The wizard takes you through connecting the camera with your iPhone using BOTH Bluetooth and Wi-Fi. Couple things to note. They ask you to create a 6 digit Bluetooth password. I mistakenly entered a 4 digit one, and it wouldn't connect and didn't tell me why. Eventually, after entering in 6 digits, it worked fine.
Within the camera is a little Wi-Fi server. The setup wizard asks you to point your iPhone camera (not the AIR camera) at the QR Code under the AIR rear cover to help install the AIR Wi-Fi network onto your iPhone. For this connection you don't get to create a password; I assume the QR code has the correct password. Once the AIR Wi-Fi network is setup, the wizard will try to CONNECT the iPhone to the AIR Wi-Fi network. IMPORTANT: if you're already connected to an existing Wi-Fi network, you'll need to disconnect and try to connect manually using the newly setup AIR Wi-Fi Network. It all sounds more difficult than it actually is-- and I was up and running quickly.
As far as I can tell, the AIR uses Bluetooth to communicate commands back and forth to the smartphone and vice-versa. Other features, including live previews, display and transfer of pictures are enabled only when connected to the AIR Wi-Fi. Along with AIR Wi-Fi, features such as txtMsgs and social media will use your phone cell connection to post data-- which can lead to large bandwidth uses if you're not careful. It would sure be nice to have some instructions or understanding of EXACTLY how this all works-- as this is all my best guess at this time.
When AIR is connected to your smartphone via Wi-Fi, your smartphone is no longer connected to the Internet via Wi-Fi, only via your cell network. This is an important concept to be aware of as we shall see later when trying to use Amazon Cloud Drive.
Swapping lenses is pretty standard, and even neophytes should be able to figure it out. I purchased the camera with bundled 14-42mm EZ lens. The kit also came with something I thought must be some sort of mouting adapter: Olympus part LC-37C. Later, after using the camera, I decided to research the part as there was nothing in any of the documentation I could find about it. After some Internet research, I found it to actually be a special lens cover which opens and closes automatically for the 14-42mm lens, thus negating the necessity of the traditional lens cover. Cool! I figured it just snapped on like the lens cover which came with the 14-42. Nope. I couldn't seem to get it to fit. So, back to the Internet. Turns out it SCREWS on. I'm sure experienced photographers know all this, but I didn't. Again, another failing of the customer journey. One other *issue* with this automatic lens cover, is it doesn't close when you're doing things like viewing and transferring pictures, which sometimes takes several minutes-- all the time with the lens not covered.
Once the setup wizard was complete, you are placed into the main OA.Central App screen. It's basically broken into 4 app areas: Mode Dial, View Images, Camera Settings and Amazon Cloud Drive.
Pretty self-explanatory-- or so I thought.
MODE DIAL
The Mode Dial button launches the main camera interface including viewfinder and settings. I'll go into it a bit later, but suffice to say there is little if any documentation anywhere on the Internet on how this app and all of it's settings works.
VIEW IMAGES
View Images button takes you to the images screen and is at first fairly self-explanatory. You click it and if connected to the AIR Wi-Fi, you can peruse the images on the AIR micro SD card. From there you can copy the images to your smartphone, or send them via txtMsg or social network to friends, plus do a couple of other things. The only problem with this app is it places a funky icon on *some* of the images at the top right. It looks sorta like a rolling pin over a film strip. For the life of me I don't know what it is or why it was created. Only some images have it. Anyone with an idea, please let me know in comments.
In the View Images settings, there's a setting called IMPORT Resize which defaults to 3M (2048x1536). As I assume this is also what get's transferred via saving to smartphone, I've changed it to "No Resizing" so I can save full resolution images to my smartpone and Amazon Cloud Drive (more on *that* clustermess later).
Camera Settings are fairly self-explanatory. One setting you might want to change is the timeout period under General > Sleep. It typically defaults to 3 min which can be too short if you're inside a known Wi-Fi area. If you don't intereact with your camera within the timeout period, it goes to sleep and it's Wi-Fi network shuts down. Then your phone will auto-connect to a known network and if you try to use your AIR again, it's Wi-Fi network starts up but your phone won't auto-connect to it as it's already connected to a different network. So, you have to manually disconnect from the existing network and select the AIR network, which can be tedious.
AMAZON CLOUD DRIVE
Amazon Cloud Drive is different than what I thought it would be. Again, there is zero information or instructions on how it works with the AIR. So, this is what I've figured out from several tests.
First off, Amazon Cloud Drive is a web service Amazon has where you can store your images on their cloud servers for a small fee, or FREE if you're a Prime member, which I am. Logging in is straight-forward and easy. The real problem is *HOW TO GET THE PHOTOS FROM THE AIR TO THE CLOUD?*
This took me awhile to figure out. Basically, the only time one can view the images on the AIR micro SD card is when it is *connected* to the smartphone via Wi-Fi. But, if the smartphone is connected to the AIR Wi-Fi, it is *NOT* connected to the Internet and therefore cannot communicate with the Amazon Cloud Drive. Olympus PR and marketing don't explain this and one is left to believe you can *just store your photos on Amazon Cloud* to save space on your smartphone. I could find no way for this to happen directly-- as in directly from the micro SD Card to Amazon Cloud.
Here's how it works: First you move all your photos from the AIR micro SD to your smartphone by manually tapping each and every photo (no "Select All"?) and then selecting menu item "Save to smart device." The app will then transfer all selected photos to an Album called "Olympus" on your iPhone. (Of course you can configure the main capture app to auto-save every picture to your iPhone when taken, but the save time is just too long for any sort of continuos picture taking workflow.)
Once all selected pics are transferred to your smartphone, you must then switch to an Internet enabled Wi-Fi Network and allow the images to auto-upload to the Cloud. There is one way around from having to switch Wi-Fi networks, and that is to go into the settings for Amazon Cloud Drive and choose: Auto-Save > On > CHOOSE NETWORK > Wi-Fi + Cellular (instead of Wi-Fi only). When this setting is enabled, it's no longer necessary to switch off the AIR Wi-Fi network as you'll transfer you images from your Olympus album to Amazon via your cell network. Unfortunately, this can be slow and expensive; you might want to be careful with this setting. Once all transferred to the Amazon Cloud Drive, you can then delete the photos from the micro SD and your Olympus iPhone album.
One setting to be careful of in the Amazon Cloud Drive app is the Resize setting. You'll probably want to transfer the images directly to the Cloud at the same resolution you originally shot them, so be sure and set Resize to "No Resizing."
So, basically, the process of archiving images to the Amazon Cloud Drive is 4 steps:
1. Shoot and save on micro SD Card
2. When ready, transfer images at full resolution to the iPhone "Olympus" Album using the VIEW IMAGES app.
3. Transfer from Olympus Album to Amazon Cloud Drive with Amazon Cloud Drive app.
4. Delete images from Olympus Album and micro SD Card.
MODE DIAL APP
The Mode Dial app is the app you use when you want complete control of the camera and picture taking experience. Unbenknownst to me, another suite of apps can be accessed by *swiping* the Mode Dial App button to the left. They are Art Filter, Color Creator, Photo Story, Clips and Genius. I'll not go into great detail on any of these. They're fun to play around in, but most users will stay with the Mode Dial app.
A quick primer on how things work in the Mode Dial app.
Icon buttons Top Left to Bottom Right
LEFT:
Settings (Gear icon)
I pretty much leave the settings at their default. As previously mentioned, the Save Destination should be left at "Olympus Air" and not "Olympus Air + Smart Device" in order to allow for a less interrupted workflow when taking pictures.
Options (Grid of 6 squares icon)
1. Drive Mode: switches between single image and multiple image shots
2. Face Priority: On/off
3. Picture Mode: Filters (not available in iAUTO mode)
4. AF Mode: S-AF (autofocus mode), MF (manual focus)
5. Metering: ESP, Ctr-Weighted, Single Point (not available in iAUTO mode)
6. Aspect: Aspect Ratio 4:3, 16:9, 3:2, 1:1
Zoom (Magnifier icon)
With the included Olympus MSC ED M. 60mm f/2.8 Lens, you can control the optic zoom using a slider on the right of the screen, OR manually with the zoom ring on the lens.
Timer (Time icon)
Self-explanatory for setting auto timed shots
Disp. (No icon)
Toggles: Grid overlay, Mode settings overlay, and Both overlay
Home (Home icon)
Goes to Home screen
RIGHT
Mode button
Choose from: iAUTO, P A S M and Video
PASM is part of the Olympus camera controls nomenclature. From their website:
P = Program Mode
The P mode allows you to have more control of the camera. In P mode you can change your settings (including exposure) to what you like, but the camera will set Aperture and Shutter automatically for you.
A = Aperture Priority
The A mode allows you to set the aperture manually while the camera sets the shutter speed automatically. Changing the aperture value you can give your pictures different expressions - you can have separate subjects in the front and back of the picture both in focus, or you can narrow the area of the picture that is in focus so the main subject stands out against the background.
S = Shutter Priority
The S mode allows you to set the shutter speed manually while the camera sets the aperture value automatically. By changing the shutter speed you can "freeze" the subject's movement in the picture, or you can deliberately create a blur, giving a stronger sense of motion to the picture.
M = Manual Control
In Manual Mode (M), the user selects both the aperture and the shutter speed. When shooting the moon in the night sky or the multi-colored lights shining in a night scene there is a great difference in light level with the brightness of the surroundings. In manual mode you can shoot without the brightness of the surroundings affecting the exposure of the main subject.
RIGHT-MIDDLE
Shutter button. Tap to click. Of note, the camera reacts faster to the shutter button on the camera vs the one on the iPhone.
RIGHT-BOTTOM
Review images. You can scroll through images and delete without having to exit the Mode Dial app.
So, HOW DO I LIKE IT?
Actually, now that I have it somewhat figured out... I like it quite a lot. I purchased a small pouch which can hold the camera and lenses along with a small smartphone battery recharger which WORKS great at recharging the camera, too. One of the interesting features of this camera is you can continue to use it while it charges, which is good as there's no removable/replaceable battery packs.
I've enjoyed taking pictures and I really like the ability to transfer the images quickly to my iPhone and use them how I like there. Plus, the Amazon Cloud Drive is very nice for archiving even if it is a bit obtuse in how to get it to work correctly.
I *really* enjoy the ability to hold the camera up high or down low in my left hand while holding the iPhone in the right to frame and take the picture. I've seen online pictures of AIR photographers with their backs to a scene and able to take candid shots this way with no one the wiser. I believe this feature alone differentiates it significantly from either the build-in iPhone camera, a mirrorless camera or a SLR camera.
Also, being a programmer myself, and knowing of the open nature of this camera, I'm interested in seeing what sorts of apps will begin to show up in the future-- everything from security camera apps, to facial or image recognition to awesome drone/robots with superb recording capabilites.
So, even though the customer journey gets an 'F,' I still rate this camera high. I hope this review gets some folks past the poor initial learning curve and they can start to enjoy the camera.
Problems connecting with the smartphone
by chris_nwb (2 out of 5 stars)
August 15, 2015
I have an Olympus E-PL2 and was looking for a way to optimize my workflow and reduce accessories when traveling. Aside from being really compact, the Air A01 allowed me to:
1. Transfer photos directly to the smartphone, edit, and share to social media on the spot.
2. Recharge the camera using a cellphone battery pack.
3. Use the smartphone as a remote shutter.
I only have lenses left in camera bag with the card reader, battery charger, extra batteries, and remote shutter out.
There's one big problem though: the Air A01 can't reliably connect to the smartphone! From off or standby, it will take several tries (including rebooting both the smartphone and camera). Thinking it could be the Moto X's problem, I tried it with a Galaxy S6 and got the same result. If it does connect, it will take at least 10 seconds before you can use the smartphone as a viewfinder. I can still use the camera's shutter button during this time, but I'd be guessing where it's focused or how the photo gets composed. Plenty of missed moments, lots of frustration.
Ended up returning the Air A01 and got an E-PL7 instead. The latter is not as compact, but its built in wifi also allows me to do 1 and 3 above.
The Air A01 has good potential and hopefully the issues get fixed with software updates.
Compact, light-weight, and reasonably priced. Love it!
by Lackofagoodname (5 out of 5 stars)
October 3, 2016
This camera has been an amazing upgrade for me! Up until this camera, I was using an Olympus E-410, which was at least 6 years old... Still worked great, but was ready for an upgrade.
First, I love tech - therefore anything that is an advance in technology wins in my book. This camera is certainly at the forefront of technology being that it is not a traditional camera body. It is innovative and the possibilities are limitless with this camera.
Second, size matters. I always hated carrying around the E-410. The big camera body with lenses left me feeling like a tourist more than anything, which I absolutely hated. I prefer to be more discreet with my shooting, and this seemed like the ideal answer to this particular dilemma.
Finally, I just needed a camera that was more up to date. From MP to image sensor, to ISO, my E-410 was holding me back to a point.
I have used this camera for a number of outings and events, and it has yet to disappoint. I love that without my phone it will work as a point and shoot. The transmission between phone and camera has been stellar, though occasionally there will be a lag while the image is saved. Could be because I shoot in raw+jpg, but generally it is not bad.
For the photo samples I've included, my pup is my model and puts up with a lot from me and my camera. Superb clarity with decent light, and using the kit lens that came with the Olympus Air. Second around the campfire was a long exposure. I set the camera on a tripod and held my phone, which acted as a remote to trigger the photo. Third was a long exposure with adequate lighting of a waterfall. Colors popped and got the effect I was looking for.
As far as price, I believe this is fair. I was considering a more expensive camera until I started toying with the idea of the Olympus Air. I would absolutely recommend this camera if you need a compact, light-weight camera.
An intriguing product that just didn't work for me
by Michael J. Muscato (3 out of 5 stars)
August 30, 2015
I ordered this item a few hours after "discovering" it and reading some quick reviews. I'm probably the type of customer this is pointed towards: an existing Micro Four Thirds user with a couple camera bodies and stable of lenses, a smart phone user and a bit of a gadget hound.
It's a very interesting product and is well made and solid. Picture quality is excellent as one might expect; it has a modern four thirds sensor and current TruePic VII engine. And you can use any Micro Four Thirds lens you have on hand. It sounds great. So why did I return it?
My main issue comes down to actually handling the product. You may not have a camera body to lug around but you still need at least one lens, the Air itself and your smart phone. (Unless of course you're shooting blind and just whack the expose button on the Air and cross your fingers). It was too unwieldy for me. In fact, once the iPhone is in place in the holder the simple act of aiming, focusing and hitting the expose button is a bit of a chore. And if you're using a non-stabilized lens (every Olympus lens) you'd better be sure you don't jitter or shake whilst performing this two handed task. If you plan to use this on a tripod or simply set it down and control remotely then this is not a concern. However, I was hoping for something portable and ready to shoot.
As you may have read in other reviews there are also access issues for USB charging and the memory card. The back of the device actually has two plastic parts that must be removed to simply insert/remove the MicroSD card. The phone holder must first come off and then a second plastic covering plate. Since you can upload files from the Air via the iPhone app, or transfer via cable you may not need to access the memory card too often but it's still an odd design choice. And as mentioned, the USB port cannot be accessed unless the phone holder part is removed.
Frankly I'm still impressed with the technology on display here and would have kept the Air if I felt I would get some use out of it other than sitting around and tinkering with it. But the ungainly handling issues convinced me pretty quickly that it would spend most of its' time on my shelf. A bit disappointed. Perhaps I just had unrealistic expectations of how it would work.
Great idea, OK execution.
by Mike Conte (3 out of 5 stars)
March 19, 2016
Pros
- actually fits on an iPhone 6+, with a case. And firmly.
- I've had no problems with the battery life.
- Has a much bigger and better sensor than your phone, and the m4/3 glass is generally quite good
- nice to have a level display (front/back and side to side) while taking pictures
- really easy to update firmware in your lenses, finally!
Cons
- definitely more of a fuss to put it on, power it up, run the app than just grab your camera.
- the software is laggy, even on an iPhone 6S+, with the display sometimes not keeping up and the first few focus taps being ignored.
- i've had a few freezes and crashes while taking pictures and also while transferring
- as others have noted, having to connect to the Air via it's private wifi is a pain. When you are out shooting, it's not much of one, since your phone is probably not on wifi. But at home/office, my phone is always connected to my wifi so connecting to the Air to, say, transfer photos, is a pain. Seems like they could fix this with a profile and some bluetooth bootstrapping.
- There is a feature to automatically send each picture you take to the camera roll on the iPhone...but there is also a warning that "this does not always work." Guys...that's a bug. I am sure you can fix it.
- the software is a bit odd. When you start it up you are presented with 4 panels...if you want to take pictures, tap the one that says "Mode dial." Really?
If they write a great v2 of the software, I think this could be a much better product. Good enough you might leave your camera and never regret it.
Overall what you'd expect; one odd oversight in photo retrieval, though.
by Warren Adams-Ockrassa (4 out of 5 stars)
December 30, 2015
It's a very small micro 4/3 camera, as advertised. Basically little more than a 2.5" deep extension to your lens. I've found it useful to mount a 12mm lens to and take wide-angle supplementary photos, essentially shooting blind, in conjunction with my OM dSLR's.
While the Olympus app for your phone will let you access the settings on the camera, including all the usual suspects such as shooting mode, shutter speed, aperture, focus, etc., the controls are just awkward enough - particularly if you're trying to hang on to both the camera and your phone (recommended even if you have the phone mounted on the back of the camera) - that I wouldn't want to use this as my *primary* camera at any shoot if I had any other option. It would be a little too much like juggling.
That said, if you need a handy supplemental camera and are able to set this up someplace convenient - or don't mind firing a lot of shots without being totally sure at the time how the shots are framed - go for it. The sensor quality is on par with the OM series, and the build quality is good too. Despite its small size this is an optically capable device, and functions well.
The thing that cost Olympus the star here is that I don't know of a way to directly upload photos from this camera to my Mac. (I shoot raw, not JPEG, which does add a complication, but the functionality I'm looking for here is not especially difficult to manage.) There doesn't seem to be a way to do it via USB cable; I have to pull out the MicroSD card instead and pop it into an adapter, then into my SD slot, to get at the files directly. This is in contravention to the way the OM series dSLR's work, and a bit of an inconvenience ... not just because you need to use an adapter, but also because you need to remove a couple layers of caps and hardware from the back of the camera to get at the MicroSD card. At some point, eventually, Olympus may address this strange oversight; if they do, I'll revisit this review.
Wanted Sooo Much to Love this Camera :(
by chik-flik (2 out of 5 stars)
October 17, 2015
I bought this camera the day it became available in the U.S. I love the Olympus Pen system and was thrilled I could use my lenses on the Air. The image quality is superb which is why I'm giving it any stars at all because the overall experience has been really horrible. The first Air I received would only connect with my phone sporadically. Amazon let me exchange it no problem. The second Air I received seem to work way more consistently. I had a lot of fun connecting my different lenses. Everywhere I went, the Air connected to my iPhone 6s plus created quite a draw. And as I mentioned, the image quality is really super! Then, after about 5 weeks, I started having connectivity issues again (this is with the new unit). I tried everything -- rebooting, resetting, firmware update -- but nothing worked. The last few events I went to, I had to bring a back up camera which defeats the purpose of buying a camera like this. I really hope Olympus devotes the resources needed to make this camera as great as its other photo products. But right now, in its current iteration, it's not worth your money or the time you'll spending trying to get it to work.
A little something for everybody...
by Apollo (4 out of 5 stars)
July 27, 2015
When I first heard about this I was excited and brimming with all the possibilities I could use this for. I love having a camera with me at all times but in the day and age we live in more and more places are banning "pro" cameras and I think at least for a little while (until it catches on and people are looking for it) this may be a solution for some.
Like some have said already the Olympus Air A01 doesn't come with much documentation... so if you aren't super tech savvy I would be a little cautious but I would definitely recommend this for someone who hasn't had a interchange lens camera yet. Chipp Walters in the reviews here does a really good job of explaining some of the quirks, especially if you're new to the mirrorless world.
I will say if you have a larger phone like iPhone 6+, galaxy note, or the nexus 6 like I have... you may have to take off your protective case to make it fit on your phone. Good news though, is that once it's on your phone it fits snug and I didn't have any fears of it slipping out. The coupling is made of metal plastic and rubber. It feels really sturdy. I would still be cautious and hold your phone while using it.
The charger for this is micro USB, so if you're an android user you can use the same cable as your phone. At least on android setting up the device was a snap. It took me only a few minutes. You will need a micro SD card to take pictures. It doesn't have any internal memory and you can't use your phone's memory (you wouldn't want to especially if you use RAW)
For those advanced users who use RAW to process in lightroom and photoshop... neither program at the time of this writing can recognize the RAW that Olympus uses. Olympus's viewer 3 will recognize them and it's just an extra step of converting them for the time being. I'm sure adobe will update their software.
I haven't had much time with taking photos yet. The few I've taken indoors weren't that great. That's mainly because you have to have pretty high ISO to get blur free shots since Olympus chose not to have image stabilization in this device. I'm not sure if there is some physical limitation because this camera is so small or if they were trying to keep a certain price point... regardless for a 299.99 USD price tag I can hardly blame them. If I have one complaint and or suggest for a future model... image stabilization would be it. I hear that you can use Panasonic lenses that have image stabilization and it will work but I haven't tried it yet. It seems kinda crazy that Olympus would make a device that makes you more inclined to buy their competitor's lenses but it is what it is.
The sensor from what I read is the same sensor they used in the Olympus EM10 and that is a terrific little camera. I'm hoping to get out more with the camera and put up some samples and run it through the paces, so be sure to check back in the coming day-weeks.
The people who I would think this camera is for... people who are looking to buy their first time camera. It's cheap and light and on a great platform for lenses and for photojournalist, it's discreet and you can upload photos quick to the web and great for places like concerts that ban cameras with interchangeable lenses. I don't really fit into either of those groups but I my camera bodies are expensive and it's not always practical to carry around my camera that cost 1100 and that's without the battery grip and grip that I tacked on. With the Air A01 being so cheap, If I lost this or broke it... I wouldn't be too hurt about it. I definitely think this is worth the perchance. It's not perfect but if they can fix that one issue with not having image stabilization the next version will be.
Great camera! If you have already invested in the 4:3 system, and like photography, this is a no bra
by Stewart Harmon (5 out of 5 stars)
June 18, 2016
So very cool! I agree with everyone that it takes a few minutes to get the SD Card in and figure out the back cover. But that is initial set-up and 5 minutes of life.
But once I got playing with it, it is so very cool! I have been using a 17mm 2.8 lens (the whole thing is 4") and got to take it to downtown Seattle. I didn't frame picture by placing my phone the cradle to make it act like a regular camera. I left my phone disconnected and took shots by feel or my perspective. A lot of them came out amazing!
Another fun thing to do is set the camera down somewhere and control it from your phone via live streaming. You can get a really interesting series of shots.
And the phone app has the full suite of controls that a camera body has. Although they are not as fast as the dials on a camera body are.
My only complain is that I haven't figured out how to use 10fps by just holding the shutter down. And it's hard to press a shutter 10 times per second!
Too many missed photo opportunities!
by earachemyeye (2 out of 5 stars)
August 10, 2016
My OMD was stolen out of my suitcase on a trip to Cambodia and I decided to replace it with the A01.
The camera is just way too slow from the time you power on to shoot and the battery life is way too short on both the camera and the phone to simply leave it on all the time.
Secondly I find that it's not stable, is fiddly and doesn't always connect. I'm going back to buy another OMD for everyday use and likely sell this one on eBay.
Customers Who Bought This Item Also Bought

*If this is not the "Professional Smartphone Camera Lens" product you were looking for, you can check the other results by clicking this link