UrbAlive Indoor Worm Farm | |||||||||||
| |||||||||||
Product Description
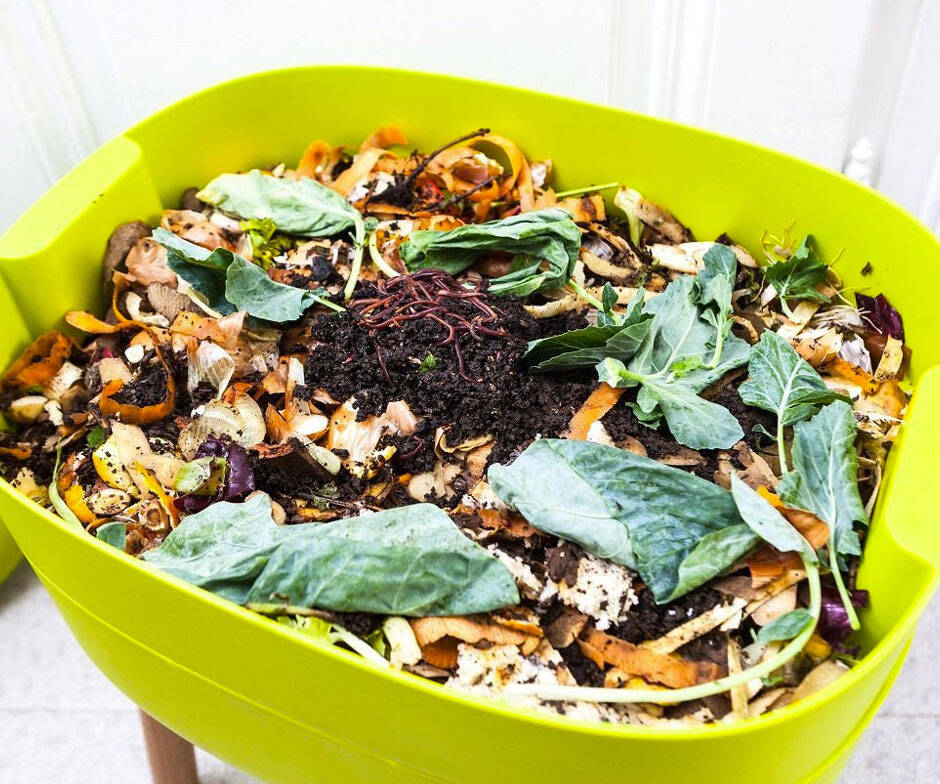
Make your city life green, enjoyable, fun, responsible and sustainable. The Urbalive Worm Farm enables you to use food leftovers purposefully. Red worms or red wigglers (Eisenia foetida or Lumbricus rubellus) easily process your household bio waste into a natural fertilizer that provides optimal nutrition and protection for your plants.The Urbalive vermicomposter is for indoor use. It was designed by a Czech leading designer Jiří Pelcl and manufactured by Plastia, an established European producer of premium gardening equipment. And was awarded by reddot design award, the worlds most prestigious design price. The original high design makes this worm farm a very stylish furnishing. The earthworms are not supplied together with the vermicomposter.Features
- Smart kitchen bio waste processing.
- Indoor year-round use.
- Sleek & modern European design and origin.
- Step-by-step instruction guide.
- Great tool for ecological education.

Top Reviews
We are loving this composter! 1 month update with a new problem.by Aundrea (4 out of 5 stars)
June 14, 2016
I have been interested in composting for years. We moved 2 years ago from an area that had kitchen scraps composting with yard waste, but our new city doesn't do that. I had looked into regular composting, but it seemed like a lot of work and with a baby (now 2 year old) it wasn't right for me. I had also researched vermicomposting, but hadn't actually done it. I was contacted to see if I wanted to review this and jumped at the chance since it had been an interested of mine for a long time. Plus, I realized it would be great for my kids to help with and learn about. I'm going to talk first about the composter, but then throw in a little info about our whole composting experience.
Unpacking and setting up:
This was very easy to set up. It came mostly assembled. I screwed in the legs and inserted the spout and we were pretty good to go. It came with a brief instruction guide. I recommend if you are new to composting to do plenty of research first. It's fairly easy, but does require a little commitment. Given that you're looking at around $200 to get started (with worms) and a couple hours initially and about 30 minutes a week, I think it's worth researching. I spent a couple hours looking at web sites, reading recommendations, comparing products, ect. Then I determined it was something I was willing to invest some time in.
Composter unit:
The composter looks really nice. I've looked at various worm composters and can say this honestly the most attractive one I've seen. It is sleek, modern and clean. Without someone telling me, I wouldn't guess this is a composter based on looks. It is absolutely attractive enough for a home. I've been using it with my worms for almost 2 weeks. I have it in my garage because I have a 2 year old and don't want to find worms scattered all over my kitchen. It's also protected from the heat/cold in there. But, I can tell you I would feel absolutely comfortable keeping this in the house. I haven't found any worms on the ground outside nor have I had any leakage. I am starting to collect the fluid in the bottom and none has dripped out. This would be excellent for individuals with limited space or anyone who wants to compost inside.
Worms:
I called around to some local bait shops and sports stores. I found a list online of local places. Only one had worms and they sold them in batches of about 20. That obviously isn't enough, so I ordered them on Amazon Uncle Jim's Worm Farm 500 Count Red Wiggler Live Composting Worms I purchased 500 worms, although in hindsight I wish I would've purchased 1,000. I read everywhere that worms reproduce like crazy, so I figured I'd save a few bucks by ordering 500. After getting everything set up I realize we product a lot of kitchen scraps and wish I would've started with more. I am very happy with my worms though.
Our composting experience:
We've been going at this 2 weeks. The first few days were a little rough for me. I read all about what to do, but I didn't realize that I would be a little anxious those first few days. First of all, I had everything set up. Damp newspaper, some kitchen scraps and my worms. I had read about everything, especially that initially they are a little out of sorts and like to escape a lot. I put the worms in and closed the lid. Unfortunately, my kids were super curious and opened the lid a couple times that day, then my mom came over and opened the lid. The worms HATE light. So not only were the settling in, but they were mad that light kept coming in. The next day I looked at the screen and the bottom. Probably half of my worms were either on the white mesh or in the base of the unit. I was so stressed. I wasn't sure why they were leaving, I had given them a wonderful array of yummy treats. After reading some articles again I realized that escaping for the first few days is completely normal, but also that the light wasn't helping. I put them all back on top and vowed to keep the lid closed for a few days. Every since then I've only had a few stragglers get out here and there. They do make it all the way in the base if the tub, which I'm very confused how they get around the mesh. Somehow they do make it back up though. So all my worrying about them escaping and dying a slow death in the bottom of the bin was unfounded. They come and go as the please for the most part now. Sometimes I do spend a few minutes collecting them and putting them back up in the tray though, but not very often.
Tips (these are all things you can find online or in the instructions, but this is what I would tell a friend if they asked for tips)
-They hate the light. Use it to your advantage. I wish I would've used glow sticks or a light source in the bottom of the bin for the first few days. If I would've done that and kept the lid closed I think they would've stayed where they belong.
-Chop food up. This speeds up the process by quite a lot. I save my composting material and then chop it all at once.
-Use more bedding than what you think. One article I read said up to a 4:1 ration (bedding to organic matter). I learned that my paper shredder is my best friend. It's so much easier than ripping and makes smaller pieces. My shredder will do cardboard, so I cut the flaps off my boxes (free of tape) and put them through. I also put my non colored newspaper in there. This made it so much easier!
-Only put food in every 4 days (ish). I have read some people who add a little everyday, but I found that it takes less time if I save my scraps in a bin under the sink and then chop them all at once. It also keeps the light out as much as possible.
-Check the bottom. You may think they can't get around the screen, but they may be able to. You can check the bottom without lifting the lid. Just have someone life the tray with the lid on it off, then you can check what's going on down below.
-Order more worms than you think. They do compost pretty quickly, but after collecting our stuff I realize that we have a lot of scraps. Yes, they will multiply, but I realized it was like $6 more or something for 1,000 versus 500 worms. I wish I would've ordered more.
Overall, this is great composter. It's fun and environmentally friendly to compost and great for your plants. I will update as time goes on and I harvest my first batch of castings! I was sent this for testing and review purposes. I never let that influence my rating or review of products. This is just a wonderful composter!
1 month update: I am excited that I can see so much progress. The worms are mostly staying in their home. I check every couple days and less than 10 are usually down in the net area or in the bottom. I keep checking though because if conditions become unfavorable then they will mass exodus out to the bottom, which I want to catch if it happens. I am about 1/3 to halfway to my first batch of castings. Yay! There are a few issues that have come up that I want to mention though. First, I don't kow if I recommend leaving this in the house anymore. I have a small mite problem, which is very common from my research on the matter. It's not uncommon at all for mite to set up shop, I'm doing some things to discourage them from staying, but I would be very unhappy if they were in my house. Worms also crawl around on the lid and leave dirt up there, so occasionally when I remove the lid dirt will drop off. Not cool for inside the house. Problem #2. I'm lowering my rating of this composter because of this. Below the bin there's a screen that collects dirt and worms (although worms and dirt still end up below, but at least the worms don't fall all the way down and die). There are cloth handles on either side of this to lift it up. The material it's made of apparently is yummy to the worms because they have eaten my handles away (see pictures). I now have to find a small edge to grasp if I want to lift this up. This makes me worried that they will eventually eat away at the cloth screen as well. This definitely should be redesigned! It also should be made with something that is easier to clean. I give it a few more months before it's icky beyond saving. On a positive note, I'm seeing lots of baby worms in my bin! Yay! I don't know if it's because my worms shipped with eggs or if it's because they're reproducing already, but I'm happy!
3 month update: I feel like we've hit the sweet spot with the worms and the composter. I don't find many worms in the bottom or on the screen anymore. Usually about 10 total outside of the composter. Sometimes I go a week or two without adding and then add a bunch or sometimes I had a few slices of fruits/veggies a day. We still have little bugs on and in the composter. I still wouldn't recommend this for indoors based on my experience with it. I have tried egg shells and coffee grounds to discourage the bugs, but haven't had any luck. About two weeks ago I felt we had reached the end of the cycle with our first tray, so I placed the second one on top and started with a bunch of shredded paper and some food scraps. I've been slowly adding since then. About half of the worms have migrated up to the top. I am hoping the rest catch on and head up. I'm sure once there's nothing left to eat they will get the hint and enjoy their new dinner selection. I am adding pictures of the compost produced.
Super easy to use!
by beeflea04 (5 out of 5 stars)
January 24, 2017
So far, so good! Very easy to put together and it looks great! We have it sitting out in the open, and you hardly even notice it. It looks like a piece of furniture. The worms have been very busy composting since we started it right after Christmas. We put on the second layer last week because the first layer was nearly full. The worms have just started migrating to the second layer. We haven't had any issues with worms escaping, except when we open the lid to add more scraps. The worms crawl all over and they seem to like the lid, so if you lift the lid and there are worms on it, they might fall off. We just pick the worm up and put it back inside. Overall, we're very happy with our worm farm!
but has some annoying flaws. The instructions say the legs come with ...
by R. Jacobson (3 out of 5 stars)
June 28, 2016
This is an attractive product, but has some annoying flaws. The instructions say the legs come with pre-drilled starter holes for easy fastening...mine had no such holes. It also says that if you've assembled it correctly worms can't escape. Other than putting the legs on, there is nothing to "assemble." I had a worm exodus on night one and couldn't have assembled it any differently than how I had it. I added a bit more moisture and the worms seem to be happier...or they just saw too many of their comrades fall to their death and decided living in a neon green plastic home was a better alternative.
You are paying for the nice design but it's worth it - great for apartments and to convert resistant
by kk (4 out of 5 stars)
July 25, 2016
I REALLY LIKE like this worm farm! I bought it two months ago and waited until now to review so I could see it in action. I am comparing it to a DIY one level rubber bin system that I had before, that sat on the floor until it died.
PROS; Its VERY visually attractive, with a tiny footprint. It's the most attractive worm composter I have seen, which is superficial - but I live in an apartment so I see it all day , and the visuals matter to me . I find worms very cute and compositing makes me happy, but if you had a housemate or spouse thats resistant to composting , this chicly design could help sell them or at least reconcile them to the whole idea. If you want to educate your kids about compost , this cheerful design could help get them excited, and the kid level trays could make it into a fun ritual/ observation deck ( although with a toddler you may have to bungee the whole thing shut LOL). It is VERY easy to use and unintimidating, good for first time composters. It is very efficient, - I feel like the worms can get to stuff easier than the one level tub version I had before, so they process stuff very quickly. The worms seem VERY happy in there and I have not had any mass escapes, except when I put in too many cherries ( my fault). It's easy to set up and sturdy. It has a little catch all for worm casings and I think that's very cool. I haven't used them in my garden yet, but I'm excited to do so. I love that its raised high off the floor so there is no worry of stains or dampness underneath, and it makes it easier to dump stuff in as I make it. I like the 3 bin system - right now I am keeping worms in the bottom and brown paper bedding paper in the top, so its storage for their bedding, very efficient. CONS: Its quite expensive compared to other farms or DIY . Basically you are paying a premium for the nice design and color ( I knew that,and I bit the bullet) . As it is in use, there are some tiny little discolored lighter spots developing on the plastic. Its no big deal, but if you are a super perfectionist it might bother you. Like all worm composting, it does attract fruit flies/ bigs a bit, and because the levels aren't fully sealed and its raised off the ground, flies seem to hang out more at knee level than floor level like my floor bin system. Hence the flies are more noticeable. However it does come with a fly paper for that, and Its not that big a deal. I'm willing to take that tradeoff for the form factor and having it raised off the floor. Once it gets going Im not sure how much it will actually process. If you have a large family or a lot of waste it might not be big enough. NEUTRAL: it has not made compost tea yet, so I can't rate the spigot. There have been a few escapes. and sometimes worms lurk in the curved corners of the bins but I haven't had any mass uprisings. My worms are NOT migrating down to the mesh part like other posters so I can't judge if its durable enough or not... Basically if you are design conscious or want to convert a resistant human to composting , this is the farm for you!
No odor!
by Kim (5 out of 5 stars)
February 16, 2018
I absolutely love this indoor worm farm! A plant lady that I follow on Facebook demonstrated this and immediately I knew I wanted one! I have it in my pantry- no odor BUT you have to make sure you drain the "tea" from the bottom compartment or else you will develop an odor- which by the way you can use the liquid you drain for fertilizer on your house plants or even your outdoor plants! I would highly recommend this!
Vermicomposter with style
by scottw (5 out of 5 stars)
June 28, 2016
This vermicomposter has nice features, but the best part is that it doesn't look like all of the usual worm farm towers. It actually makes me not want to hide it in some back corner where people can't see it. Mine will still be going out in the garden, but it certainly wouldn't be an eye-sore if it remained indoors.
MADE IN EU!!
by Elizabeth (5 out of 5 stars)
August 1, 2016
SUPERB AND VERY CHIC EURO DESIGN.
I can't say enough good things about this. Very detailed and easy-to-follow instructions, easy to us
by ChalmondFashew (5 out of 5 stars)
July 15, 2016
I'm SUPER busy taking care of my worms, but I wanted to take time out to leave this review about their home! :)
We (the worms and I) have been enjoying this worm farm for about a month and a half now and it's going much better than expected. I'm not a huge fan of creepy crawlies and absolutely hate insects (yes, I know worms aren't insects), but these little red wigglers aren't so bad. They go into hiding anytime I open the lid, so they're more afraid of me than I am of them (not really afraid, just cautious).
At first, I was a bit intimidated by all of the instructions but I must say, the instructions are truly detailed and well written. I learned everything I needed to know from the instructional manual and more!
I didn't realize I'd need to actually purchase a whole lot of worms.... So, that was the biggest pain about the whole thing. After getting my new found friends (I order 300 right through Amazon), I was good to go. We got acquainted and the rest is history. Set up was a cinch. I put them on a cardboard and crumpled wet paper bed and added scraps on top. They really seem to like what I feed them and are even creating families!
I'm still just on one tray and don't have any worm tea yet, but it's coming along well. At this rate, I feel like maybe in a couple more months I will have a full tray and worm tea to try out! :) I feed them once a week and scrape the bin as needed. I usually give dry leaves (we still have plenty outside), veggie scraps, tea bags, coffee grounds, fruit scraps and peels.
I recently developed a fruit fly issue because I added too much banana peel. I pretty much have it under control but just remember that you shouldn't add more than the worms can breakdown because it's bound to happen (fruit flies or gnats).
I'm super impressed by the filter in this thing because I NEVER smell anything until I open it up. Then, I get a horrible whiff of spoiled food and the dampness. It really does stay enclosed and no one would ever know what's really going on inside (our guests haven't had a clue). I don't think they'd like my friends very much anyway, lol.
The design of this is really smart and stylish. It just looks like a decorative storage piece or something. Needless to say, we are all happy campers.
A free item was provided for evaluation and unbiased review.
Lets you compost in winter. Nice looking unit, worms thriving.
by Fred (5 out of 5 stars)
August 17, 2016
As an avid gardener and recycler, a worm farm has long been of interest to me. My family uses an outdoor compost pile, but composting season ends with the onset of winter weather. A worm farm gives us the opportunity to compost and recycle kitchen waste year-round. We keep our Urbalive in the basement, where the temperature is moderate and fairly steady.
The Urbalive appealed to us due to its attractive appearance and well-thought-out design. It looks good enough to keep in or near the kitchen if you wish, or if you are an apartment / city dweller and don't have room for it elsewhere. It would certainly be an interesting conversation piece.
I shred quite a bit of paper in an office shredder, and that makes perfect bedding for the vermicomposter. The directions don't call for the addition of soil or compost to the worm bed, but I added a layer of composted soil and the worms thrive in it.
Our worm population is not large yet, so they consume kitchen waste slowly, but that will increase as the worm population grows.
We do not have a problem with odors from the unit, but users should monitor the kitchen waste to make sure no mold sets in. Follow the directions for the types of kitchen waste and how to add and handle kitchen waste.
Most Elegant Wormbin Design I've Seen => A Few Tips and Tricks From This Worm Lover
by Spencer in Seattle (5 out of 5 stars)
June 2, 2016
I've had worm bins on-and-off for almost 15 years now, and this is by far the nicest vermiculture bin that I'd owned or seen. I say that because of:
1. the cool stacking system, which allows you to go with one or two worm trays (the lower one collecting more of the soil)
2. the tap/spout on the bottom is a great idea, as you can easily harvest the nutrient rich tea for your plants this way ... all of my other bins often lead to spilled and wasted tea
3. it simply looks good
Now, if you want to try worms out for the first time, I'd suggest making your own bin. If you will be using the bin inside, just use a rubbery tub. Many plans exist online. I say this because worm bins are not for everyone.
But if you know you like having worms eat your veggie scraps, then I'd definitely recommend this worm bin. It's nice a dark inside, holds the moisture you add to the worms (essential; you don't want them to dry out!), and is great for harvesting the tea.
ONE SUGGESTION: The instructions suggest shredded paper as bedding. You can do this, but I prefer to avoid the potentially toxic ingredients in white papers, as this can leach into the tea and get into you plants. Instead, I always just use dry leaves, dry grasses, or, if I'm desperate, shredded cardboard.
IS IT HARD TO KEEP WORMS? The answer is no. It's very easy. Just add the bedding, mix in your veggie scraps (cut smallish), and add water. That's it. The worms to the rest. And getting the worms has always been easy for me: all coops have someone with a worm bin who will give you a dozen. Once you have a few, you will soon have a million.
I received this item for free (or at a reduced price) with the understanding that I would post this unbiased, fair review that is an expression of my own thoughts and opinions.
*If this is not the "UrbAlive Indoor Worm Farm" product you were looking for, you can check the other results by clicking this link