Cable Lifted Storage Rack | ||||||||||
| ||||||||||
Product Description
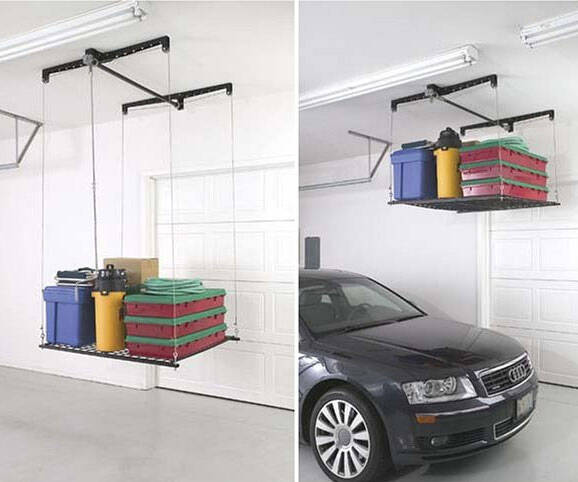
With the Racor Ceiling Storage Heavy Lift you can create 16 square feet of additional storage space without compromising floor or wall space. The Ceiling Storage Heavy Lift gives you a convenient storage solution for all of those bulky items that take up so much space on the floor, such as seasonal storage, boxes or totes, outdoor furniture, large tools, tires, or just about anything else you can think of. Made of steel construction, the Ceiling Storage Heavy Lift has a unique pulley system that lets you easily load and lift up to 250 pounds of storage items to the ceiling and lock securely in place. The Ceiling Storage Lift easily lowers 8 feet from the ceiling when you want to retrieve or add items. Raise and lower using a hand crank or attach your power drill. It has everything you need to store large items the safe, easy way without your feet ever leaving the ground.Assembly required; installs into ceiling joists. Order yours today, and reclaim your garage!
Features
- ADJUSTABLE - Mounts to any ceiling, adjust to angle ceilings with the built in nylon rings.
- DURABLE - High strength steel allows you to lift up to 250 pounds.
- EFFICIENT - Raises and lowers by crank and includes all installation accessories.
- RELIABLE - Steel cables allow for 8ft of vertical lift and securely locks into place.
- RECLAIM YOUR GARAGE - 16 sq feet of additional overhead storage space with the 4 ft X 4 ft design, making more room for the things you want to do.

Top Reviews
the rack dropped like a brickby Amazon Customer (1 out of 5 stars)
January 9, 2017
Do not buy...
massive liability, and dangerous product. The drive uses a flimsy plastic gear that will break. I had 45 pounds on this ( I weighed everything), I was starting to lower it, and the the rack spun out of control and crashed to the ground. The first time it happenend I thought it was a fluke, the rack dropped like a brick. But tonight I realized the problem, it happened again, and the other drive gear failed - again spinning out of control and crashing to the ground. - This first failure was a breakage of one side, but tonight the other drive failed. If my car or or child was under this, it would have caused serious harm. Everthing is steel except the achilles heal of a plastic cable drive gear. The second photo illustrates this. I used to think this was a great product, but the time degradation of the cheap plastic part will seriously hurt someone in the future.
Just what I needed! Negative reviews skipped details
by Hans P (5 out of 5 stars)
October 28, 2017
Bought this lifted storage platform even after seeing all the bad, catastrophic reviews that some users have written.
Install was relatively easy, followed every step of the well-written directions.
Currently I have 201lbs evenly distributed sitting on the platform and will be leaving it for 1-2 days to test out the setup. There's a ladder, BMW transmission, box full of tools, some saw horses, etc.
One thing to comment on the plastic drive gear failure - yes it looks weak, but I don't believe that carries the load UNLESS you unspool the entire cable which I don't think anyone should do. As a rule for my install and use, I will leave 2-3 turns at a minimum when lowering, to ensure that the load is not going to that plastic drive.
I'm planning on adding some safety cables in case any piece does decide to fail, it will limit any damage done below. I agree with other reviews that their are a few single point of failure issues with this design, so I will add the cable for additional safety.
On the topic of lag bolt selection....
Came with 3/16 lab screws. If they are made out of 1090 mild steel, with tensile yield strength of say 247MPa (841MPa is ultimate) or 35.8ksi, area is 0.028 in2, then these bolts would yield at 1002lbf and they would ultimately fail at 3415lbf. Now we have 20 of these screws, so if they are all properly fastened to the joist, you have 20,040 lbs needed to yield these screws, 68,300lbs to shear them... I feel like this is more than enough to hold your 250lbs of xmas decorations. Upsizing the screws may also increase the chance of missing a joist centerline. In my case they were long enough to go through the drywall and into the joists.
On the topic of sheet metal cost down where they went from large to small frame - sheet metal is really strong, particularly when you add bends to it, the U channel gives it two bends. I've dealt with sheetmetal enough to know that this frame is not going to give out, especially with all the bolts spreading the load across it.
Very well designed, good installation instructions; good for Jeep hardtop removal
by Kurt (5 out of 5 stars)
April 15, 2019
Installed this for use with my Jeep JL hardtop (pairing with the Topsy hooks). I found this to be one of the rare products with installation instructions that actually were easy to understand and logical. Took me approx 4 hours to install it (including 2 trips to the hardware store, as most of my projects wind up including). Each support arm is mounted with 10 bolts into joist, which means this is held up by 20 bolts overall. Feels very secure.
One minor issue I do have is with the 20 bolts that mounted it into the joists. I snapped off 3 of them while torquing them into the ceiling. Wound up tossing the rest and buying better ones at the hardware. But otherwise a great product!
One note: if you are using it to remove a Jeep hardtop or truck topper, be forewarned that bolts stick out the bottom of the shelf and could scratch up your top. I avoid this by zip-tying some cheap kids pool noodles to the bottom, to add a buffer between the bolts and the hardtop.
Fair, with the potential to be a home-run.
by NAK (3 out of 5 stars)
November 9, 2016
Overall, assembly was quick and easy. Find and mark the ceiling joist and 3/4 of the work is done.
I gave this only three stars for several reasons: 1]The cables come re-assembled, in bags...which I initially thought was great. Each of the four cable ends has two cable clamps on it. As shipped, NONE of the nuts on the clamps were tight. Three out of the eight clamps either already had stripped threads or stripped with very little force applied. I had to make a trip to HomeDepot for new clamps.
2] The instructions need a warning that the included lag bolts may not be long enough, depending on your ceiling covering. (many cities have codes requiring double layers of drywall in a garage.)
3] The platform bends way to much for my comfort. With less than 200# on the platform, I decided to add a sheet of 1/2" plywood for safety.
the whole house shook and parts everywhere (see pictures)
by Nettie (2 out of 5 stars)
November 1, 2015
When I installed the unit back in May 2011, I was not sure about it secure over the car so I added safety straps. Last weekend the Loft unit dropped on to the safety straps, two parts broke on the loft kit. I figured if I called for parts they would be the same, which were nylon, so I made the parts out of aluminum (these two parts are the main key of the loft kit). The safety straps are still there just in case something else goes wrong. Also not overloaded, lifts and stores up to 250 pounds, I'm using it for 8 tires (no rims) 23.1 pounds each= 184.8 pounds total.
Well designed and manufactured ceiling hoist, but not perfect
by P. Schmidt (4 out of 5 stars)
November 19, 2017
******* See update at end of this review *******
I have mixed impressions of this product. In some ways, it is very well designed and produced, but in other ways there are some glaring problems. I suppose that the problems are for the most part very minor, and will probably not be an issue for most people. But reading other reviews, and based on my own observations, I think Racor could improve this product noticeably by making a few simple and inexpensive changes.
This hoist is intended to allow a homeowner with a garage to hoist items from floor level up to the rafters under the roof, above the height of an average person's head and certainly above normal height cars. The platform that gets hoisted, and holds your stored items, is comprised of a mesh of welded stiff wire, supported by two stiffener rails which in turn are supported at the corners by four steel cables from the overhead winch. The winch itself is comprised of two steel arm structures which are bolted to ceiling joists or other wooden structures in the rood of your garage, plus a winch axle assembly and a gearbox, plus a tubular metal crank shaft which can be turned either by a hand crank that is furnished with the product, or by an electric drill (not furnished).
The hoist and platform are rated to hold 250 pounds, maximum. The platform is 4' x 4' (4 x 4 feet). The winch and cables are designed to work properly with a standard garage ceiling height between 8' and 9'. If the hoist is mounted on higher ceilings, it is possible to add extension chains (not furnished) to the ends of the cables in order to allow the platform to lower to floor height. It is NOT a good idea to mess with, or replace, the furnished cables for the purpose of adding hoist height.
I found the packaging of the product to be pretty good, although be aware that the box this comes in is large (approximately 50" long x 18" wide x perhaps 6" thick) and heavy. I was impressed with the assembly & installation manual, which I found to be large, detailed, pretty well written and illustrated. I did find that there were a couple of steps that were initially confusing or not adequately illustrated, and I thought that there were a few important points that were not adequately emphasized. Still, a much better assembly & installation manual than products usually come with.
Most of the product is metal. The few plastic parts seem to be fiber reinforced for better strength. These are used in areas where they are not under great stress, or where if they were to fail, nothing disastrous would happen. My chief complaint is that some of the metal hardware, such as bolts and screws, are made from rather cheap materials, and look to be marginally adequate. I chose to NOT use the included lag screws (they seemed to be made from aluminum or something, and appeared to be untrustworthy), and I bought better grade steel lag screws from the local hardware store.
Some of the complaints that I read in other reviews, such as, 'the hoist suddenly came crashing down without warning' could only happen if this product is not assembled correctly, or is overloaded, or if the lag screws are not installed into suitable rafters/ceiling joists in an adequate manner. The manual addresses these points, but I suppose that many people are not into reading manuals thoroughly or following instructions.
Installation took me about 5 hours, working alone. Quite a bit of this time was spent relocating my ladder over and over, and going up and down the ladder to change tools, etc. Having a helper to hand tools and hardware up to me would have sped things up a lot.
The hoist is designed to be mounted to joists that are in 4' (48") centers. If your joists are not on 4' centers, or if you need to mount the hoist perpendicular to the joists, this is possible by firmly mounting additional lumber (e.g. some 2x4's) between the joists and then mounting the hoist to that new lumber.
The hoist has steel arms to support the four corner pulleys where the cable from the hoist winch changes from horizontal to vertical. The actual weight, approximately 62 pounds maximum per pulley, is actually supported by a lag screw located adjacent to each pulley, with some help from a few more nearby lag screws on the arms. The lag screws immediately transfer weight and stress to the supporting joists. If the lag screws are not screwed in fully, or are screwed into weak materials (such as if they have to pass through a drywall ceiling and they miss the actual joists, or are screwed into the edge of the joists, or if you did not buy longer lag screws to account for them needing to pass through the ceiling) then there might be safety issues. My advice is to throw the included lag screws away, then go to the hardware store and buy appropriate higher quality lag screws, of appropriate length to have nearly 2" of screw into the actual joists AFTER passing through whatever else they might go through. You might need to slightly drill out the holes in the arms, because the included lag screws appear to be a metric size and most hardware stores will not carry lag screws in metric sizes, and they will carry nothing smaller than 1/4" which is slightly larger than the screw holes provided by Racor.
Each arm requires 10 lag screws to be structurally safe. Driving lag screws 2" into the wooden joists is a lot of work, even if you pre-drill the holes with a suitable diameter drill first (as the manual recommends). Driving the 20 lag screws while working on top of a ladder with your arms overhead, holding the arm assembly up with one hand and driving screws with the other hand, is a LOT of effort. Forget trying to do this task with an open end wrench, or a box wrench, or an adjustable wrench.....at the very least use a ratchet wrench with a socket to fit the heads of the lag screws, but much better will be to use a socket driver chucked into an electric drill (in slow speed-high torque mode)...these fittings are inexpensive at the hardware store, just don't forget to buy one when you go shopping for those new lag screws!
After mounting the two arm assemblies to the joists, you slip the pre-made cable assemblies over the ends of the winch axle, which comes in two telescoping sections, then slip one axle end into a bracket on one arm assembly, and telescope the axle so that the other end fits into the opposite arm assembly's bushing. Then a couple of bolts are used to prevent the arm from un-telescoping during use.
Some buyers have complained that the gear box on their hoist was practically dry of grease. I opened up my gear box and found it was adequately greased. I would recommend checking your gear box before assembly....you have to use a wrench to remove one bolt that acts as a pivot for the safety latch, and then use an Allen wrench to remove six recessed bolts, in order to lift one half of the gear box housing to look inside.
The winch axle is actually a square tube with some round tubular stock welded on at the ends, to provide a place for the cables to wrap around. At each axle end is a fiber-reinforced plastic disk, and the cable is pre-threaded through two holes in these disks; the disks have square holes in their centers which engage the square tube of the axle, so this is how the hoist winch rotation is passed to the cable. Some other buyers and I have decided to add a small U-bolt at each end of the axle to add more 'grip' to the cable adjacent to these two plastic disks, the idea being that we prefer to NOT rely on the strength of these disks alone. However, I suppose that Racor has engineered these disks to be adequately strong on their own, so I am not really recommending this particular hack.
Assembly of the platform was a bit of a pain. It comes on three rectangular sections of welded wire mesh, and they lock together and are then secured to the support rails using 6 J-bolts for each rail. I found this to be a fiddly process, and the rails wanted to keep flipping over as I worked on the J-bolts. Having a helper would have made this process better. I found that if I tightened the nuts on the J-bolts much more than finger tight, the off-center force would partially flip the rails up on edge, even with weight on the platform. I consider this to be a significant issue that Racor could remedy with an improved design. A BIG issue is that the threaded parts of the J-bolts are much too long for this application and extend about 1" past the bottom of the platform. I am 5'-8" tall, and when walking under the platform the bottoms of the bolts are only about 3" above the top of my head. A taller person, or a lower pair of joists, or a slightly taller load on the platform would result in these bolts hitting a person's head when walking under the platform. At the very least, some acorn nuts should have been furnished to reduce the head injury if such an impact occurs. I am sure that these J-bolts are metric, so the local hardware store might not carry compatible acorn nuts. I might look for some plastic or rubber things to fit over the bolts, or I might decide to cut all of them off right where they extend past their nuts.
The hoist gear box is operated from below using a long metal rod that has a hook on one end, which fits into an eye bolt extending from the gear box. The safety latch on the gear box is engaged or disengaged using this same rod. Once the rod is hooked onto the gear box eye bolt, the rod is turned clockwise to raise the hoist, and counter-clockwise to lower the hoist. A simple hand crank is included, which is attached to the end of the long rod using a single included bolt and nut. Also included it a hexagonal bit that you can substitute for the hand crank, and this bit can be chucked into your electric drill. I figured that I might want to use both the hand crank or the drill to operate the hoist at different times, so I bought a large "spring cotter pin" aka "hitch pin" or "hitch pin clip" which I can use in place of the included bolt and nut to attach the crank or bit to the rod. Watch out for this option though, as a spinning clip of this sort can do more damage to you than the included bolt when spinning the rod in an electric drill. Even with the drill turning the rod, the hoist raises and lowers slowly, and using the hand crank is VERY slow.
If you use an electric drill, it must be at least a 1/2" chuck size model, and be variable speed. The gear box does not give a lot of mechanical advantage, so not only will a smaller drill not be able to chuck up the bit, but it will not have enough torque to turn the rod and the gear box when you have a load on the platform. And without variable speed, the drill may spin the rod too fast to allow careful slowing down as your load on the platform approaches the 'full up' position....the load can easily hit the winch axle when raised, jamming the mechanism or doing other damage. I found that in order to get the desired slower drill speeds, I had to put my drill into 'driver' mode, where it turns slower but with more torque, but this also engages the drill's slip clutch that you would normally find handy when using the drill as a power screwdriver, and I had to select the highest torque setting on the slip clutch to prevent it from slipping as I raised a platform load of only about 90 pounds.
So overall this is a good product, but you need to install it correctly and take a few other precautionary measures to get the best results.
*********** UPDATE 11-26-17
Since I originally wrote this review, I decided to add a second hoist of the same kind. I had basically the same experience with it that I had with the first one, except that I had a problem with the two telescoping sections of the winch axle assembly......the problem was that they would not telescope.....something was binding them so one would not slide into the other. I looked down the inside of the larger section with a flashlight and could see no obstruction. I sighted down the length of both and could see no bent section, nor could I see any deformation or crimped area.. Even on the first hoist, the two sections fit very snugly, so I guessed that perhaps that perhaps the paint on the second one might be a bit thicker. I worked over the smaller telescoping section with a sander until the paint was thin, and it still would not telescope into the larger section. I used a grinder to take down the square corners of the smaller section, and even then I had to grease the telescoping areas before they would fit together. I have no idea how often this kind of problem might appear in this product.
********* I also decided to add some cheap yellow tennis balls to the protruding extended threaded sections of the J-bolts on the bottom of the platform. I simply drilled a hole in each of 12 tennis balls, sized to be the diameter of the bolts minus the threads. Then I forced the bolts into the holes by jamming the balls onto the bolts, which got them most of the way on, and finally twisted the balls clockwise to thread them the rest of the way onto the bolts. The result is two rows of bright yellow soft bumpers which help remind me to check the clearance before walking under the raised platform, and if I do happen to bump the bottom of the platform with my head, the tennis balls will prevent damage from the bolts cutting the skin. This was an inexpensive and quick solution that I can easily undo if I decide later that I don't like it, or if I come up with a better solution.
Decent product at a decent price.
by Perry Hvegholm (5 out of 5 stars)
January 2, 2018
I had no idea that these units even existed until a neighbor of mine (who was moving away) told me about his and asked me if I wanted to pull it down off of his ceiling. He couldn't use it where he was moving. Anyway...I was sufficiently impressed by it that I purchased two more Racors for my garage. Being a mechanical engineer by trade, I DO NOT understand all of the negative posts and criticisms regarding the Racor units, nor do I understand the propensity of the majority of users feeling compelled to mount their Racor rack to 2X4's instead of just mounting it directly to the ceiling. I used a stud finder, marked the full location of both beams, then pre drilled pilot holes. I then put the rack up and used an impact driver to run the screws in. The rack has ample side-to-side adjust-ability, so it's easy to line up and there is no need to use "furring strips" or other wood when mounting. If I had to voice a complaint about the Racor is that it's kind of heavy. Also, those of use who have jointed roof trussing (i,e; the lower beams are not one piece and have flat plates joining them) in your garages (as I do...most homes built after the 80's are) then you should be careful about loading your roof truss beams. I would not load this rack up with really heavy items. For medium to light weight items it's a great way to reclaim dead space in the garage for storage.
Racor misleading buyers about the quality/safety and "heavy duty-ness" of this redesigned product
by PLF1953 (1 out of 5 stars)
March 11, 2015
Racor has redesigned this product and degraded its quality / "heavy duty-ness" considerably. Specifically, the ceiling support arms, the most important parts for product safety, are now less than half as "heavy duty" (by volume or surface area) than they were in the prior design.
In the older version, each ceiling arm is 2" deep at the inside end; 4 inches deep at the pulley wheel end ( aver = 3"); and 1 9/16" to 1 7/8" wide along the channel (tapered width) (aver = 1.71875") . Each arm is 21.5" long. The pulley wheel itself is 2" in diameter. => volume = 3 x 1.718875 x 21.5 = 110.86"
The new version is 1 5/16" (1.3125) deep at the inside end; 2 15/16" (2.9375) deep at the pulley wheel end (aver = 2.125"); and 1 3/16" (1.1875") wide along the channel (constant width). Each arm is 21.5" long. The pulley wheel is also much smaller, only 1 1/2" in diameter. (21.5 long) => volume = 2.125 x 1.1875 x 21.5 = 54.25"
They call this product by the same name ("PHL-1R") and describe it the same as the early version in product literature. They (and Amazon) also use images form the older version to picture the newer, less heavy duty version.
The only conclusion to be reached is that they redesigned this product to reduce its cost and are intentionally misleading buyers about the resulting degradation in the quality/safety of this product.
The attached image shows a profile view of the original version support arm mounted to my garage ceiling (purchased on Amazon in Sept 2013) and the new version (purchased a couple weeks ago) "nested" inside it to show the radically reduced size of the new ceiling support arms.
Again, this is not the same product it was only a year ago.
Needless to say, I am returning my recent purchase to Amazon for a refund.
Works well once modified to improve safety.
by Russ (3 out of 5 stars)
October 27, 2015
The lift works reasonably well and is convenient. I have two of these installed on a ~9ft ceiling. It is not the safest design. There are several single points of failure that leave no safety margin. It will fall to the ground and hurt or kill anyone that may be under it. The build quality and quality of components is also inconsistent and requires checking. Some of the hardware is pretty lousy. Thanks to other Amazon reviews, I thought through the design and how to deal with it.
Mine are both the cost reduced versions. The reduction in strength of the cable arms is not really an issue, since the ceiling joist is what is really carrying the load of both the platform and the cables leading to the shaft. This is why correct installation is so important. My ceiling has offset joists spanning the area, so opted to mount the lift to 2x4s that are bolted perpendicularly to the joists. The plastic bearing at the back or the shaft is also not a huge concern, since the force on the bearing is fairly small. If the platform is reasonably balanced, the force of the two cables mostly cancel each other out. However, on one of my lifts the bearing was broken. This is more due to poor packaging and UPS abuse. I added a couple of bolts to hold it in place. The bushing between the shaft tube and the small square shaft that enters the gearbox is also plastic, but I haven't seen any evidence of distress there. The J-bolts that hold the platform together are of random length and sad, but seem to hold well enough if you can manage to thread the nuts on them. I got an extra in both lifts, which is Racor saying "yeah, we know these suck". On one of the lifts, the cable clamps were a little to large to push through the ends of the arms. I managed to shove them through. *sigh*
These are things that must be addressed, in my opinion:
1) Tighten the nuts on the cable clamps. On mine, they ranged from tight to hand-tight to completely loose.
2) Use lag screws of appropriate length for your installation. If you have drywall, you need longer ones. At the very least, buy 4 good lags to put at the ends of the arms.
3) Tighten the allen screws on the gear box. A couple of them were barely finger tight on one of my lifts.
4) Install U-bolts to back-up the plastic cable retainer rings on the shaft.
Item #4 is particularly amazing to me. These plastic rings attach the end of the cable to the shaft. When the cables are fully extended, they are bearing the full load of the platform. If they let go at any point, the cable tension will be lost and the lift will come crashing down. These critical parts should not be made of plastic. A small hardware-store U-bolt will back up the plastic rings, but be sure to thread the bolt though the cable so that it will hold it if the ring splits. Also watch the clearance between the U bolt and the mounting screws for the gearbox.
Speaking of the gearbox, I opened both of mine to have a closer look. The gears are steel but are poorly machined like many cheap products from China. Hopefully they are heat treated...no easy way to tell. The helical gear is small...not much bigger than the barrel that winds the cable, so it doesn't have much mechanical advantage. All of the platforms weight sits on a few teeth of this gear. One gearbox was greased reasonably well while the other only had a small glob of grease in the corner. I wanted mine to last for more than a half dozen cycles, so I packed the gears with black lithium grease. Be careful to align the tabs on the small friction spring in front of the worm gear into the square hole of the case during reassembly.
Finally in light of the design shortcomings and horror stories, I decided to hang chains from the ceiling to carry the load when the lift was up. People will be walking and working under this thing and I simply don't trust this lift as designed. Yeah it might be overboard and added cost, but it's still cheaper than building my own and much safer than using it as is. Read the front of the instruction booklet carefully. They attempt to absolve themselves of all liability beyond replacement cost of the lift.
With some modifications it's a good lift
by rmorgansd (4 out of 5 stars)
January 10, 2018
This is a decent product but you are going to have to do some simple mods to make it work better, safer and be reliable. I ordered two, one of my gearboxes would not turn. I opened the gearbox and found one of the gears was held onto the shaft with a spring whose ends were too long and was mashing against the mating gear teeth. The video attached to this review shows the problem. I removed the spring from the shaft, cut off the ends and then it cleared and was able to rotate It was a bear to get that spring back on. Also the gear lubricant was sticky and gummy, making the gearbox hard to turn . I cleaned it all out with a cloth and lubricated the gears with a high-quality gear lube. Now turns very smoothly and almost effortlessly.
There are no bearings on the gears. Everything is held together like a sandwich with the two sides of the gearbox, which is closed up with four screws. If you tighten these four screws too much the gears don't turn well because the two halves of the gearbox press against the gear shafts. . You have to leave the screws about hand tight. I used red label thread lock and put the gearbox screws in hand tight.
The 4 x 4' lift is made up of three wire rack like sections that are held together with J bolts on two rails. They have tabs that are supposed to help align and hold together the three wire rack sections but the tabs are not long enough. I used 4 zip ties ( One next to each tab as shown in the picture ) to pull the wire rack sections together such that the cabs protrude through the next wire rack section so they stay aligned for added strength. This is really necessary to do because otherwise each of the three racks sections is unsupported across its width.
Read the other reviews for other hints and modifications. With a little extra work I believe it will provide years of service.
Customers Who Bought This Item Also Bought
- Racor - PBH-1R - Ceiling-Mounted Bike Lift - Pulley System - Up to 50 lbs
- RAD Sportz Bicycle Hoist Quality Garage Storage Bike Lift with 100 lb Capacity Even Works as Ladder Lift Premium Quality
- 2004 2-Pack RAD Cycle Products Bike Lift Hoist Garage Mtn Bicycle Hoist 100LB Cap
- RAD Cycle products Rail Mount Bike and Ladder Lift for Your Garage or Workshop Holds up to 75 Pounds No Mounting Board Needed
- Racor - LDL-1B Ceiling Ladder Lift - Up to 150 lbs
- Hunter Safety HSS-ZIP2 Carabiner, 2-Pack
- FLEXIMOUNTS 4x8 Overhead Garage Storage Rack Adjustable Ceiling Garage Rack Heavy Duty, 96" Length x 48" Width x (22''-40" Ceiling Dropdown), Black (Two-Color Options)
- FLEXIMOUNTS 2-Pack 2x6ft 24-inch-by-72-inch Wall Shelf Garage Storage Rack Floating Shelves, Black
- FLEXIMOUNTS 2-Piece Overhead Garage Storage Rack Set Adjustable Ceiling Storage Racks, 96" Length x 48" Width x 40" Height, 2 pcs, Black
- FLEXIMOUNTS 2-Piece Overhead Garage Storage Rack Set w/Hooks Adjustable Ceiling Storage Racks, 96" Length x 48" Width x 40" Height, 2 Sets, Black
*If this is not the "Cable Lifted Storage Rack" product you were looking for, you can check the other results by clicking this link