Touch Sensitive Plants | ||||||||||
| ||||||||||
Product Description
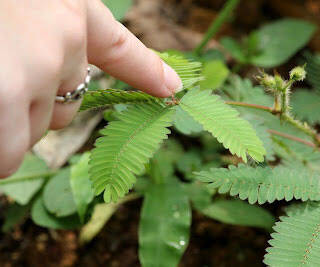
Grow Sensitive Plant from fresh Mimosa Pudica flower seeds. The Sensitive Plant is aptly named mainly because of it's physical reaction to human touch. When you brush the leaves of Mimosa Pudica, you will notice that they will close for a few seconds to minutes, later opening back up. The leaves are not the only thing to react however, the branches themselves will also move when the leaves are touched. Each plant will grow several branches filled with with touchable leaves. Each Pinna will contain 10 to 26 leaflets. Mimosa Pudica, or "Sensitive Plant" will reach an average mature height of about 18 to 24 inches tall, but can sometimes grow to a couple of feet. They are established as annual plants, growing quickly and later dying with the first frost. The Mimosa Pudica plant may produce pink blooms through the summer after a few months of growth. The flowers are roughly 1/2 inch in diameter and will become more and more visible as the plants grow older.Features
- Quality - All seeds packaged by Seed Needs are intended for the current and the following growing seasons. All seeds are stored in a temperature controlled facility that is free of significant amounts of moisture.
- Quantity - Seed Needs offers generous quantities. You can share with friends and family, or you can save the extra seeds until the following season, if properly stored.
- Packets - Each seed packet displays an artful illustration of the variety to be grown, as well as detailed seed sowing information on the reverse side. They measure 3.25" wide by 4.50" tall.
- Promise - Seed Needs will never knowingly supply GMO based seed products. The vast majority of our seeds are open pollinated & heirloom, with the exception of a few hybrids.
- Germination - Seed Needs packets contain some of the freshest seed available. Direct from the growers. If sown correctly, you will begin seeing results in only a matter of days.
- Freshness - All Mimosa pudica seeds are packaged in tear resistant and moisture resistant packaging. This keeps the seeds a whole lot fresher than the competitions selection!
Top Reviews
Germination in 2 daysby Andrew (5 out of 5 stars)
June 6, 2013
I chilled the packet of seeds in the fridge for 5 days. I nicked 20, and soaked 20 for 24 hours in a wet paper towel. I planted both of those, no germination from either yet after a week. However, I left another 20 seeds soaking in a paper towel for 48 hours and 16 of them have started growing. Planted these and already have half inch shoots
Seemingly excellent
by BuyerOfThings(Online) (5 out of 5 stars)
July 14, 2016
So far so good!
I tore open the package and let them sit in a steel mixing bowl filled with warm water out in the porch in the sun for about two days before planting 4-6 seeds per little container in some moisture control potting soil. Within less than a week I had itty bitty growths, and now just about 3.5 weeks later I have pretty substantial looking little weeds! Some are doing better than others, and the ones I've re-potted into a smaller pot are the biggest. I'm a pretty big novice and it worked for me. People who I've shown love the plant! First photo is about 5 days after planting, the other is just under 4 weeks.
Success! Baby sensitive plants
by G. J. Gaspari (5 out of 5 stars)
April 11, 2016
I have 25 healthy shoots out of 40 seeds I planted in the last week. Very pleased so far and hoping all of these grow into adult sensitive plants. After reading other reviews on how to germinate, this is what I did:
1. Refrigerated seed packet for 1 week.
2. Soaked 40 seeds for 24 hours in room-temperature water.
3. Set A of 20 seeds I planted and covered with a ziploc bag to make a mini greenhouse. Set B of 20 seeds I wrapped in a wet (saturated, not dripping) paper towel, put it in a ziploc with a 1-inch opening, and clothes-pinned it to my baseboard heat. Unzipped all the way a couple times during day to let more air in.
4. 24 hours later, I removed Set B from the wet paper towel and planted those as well, in the same manner as Set A. 13/20 seeds had shoots coming out at the time.
5. After 1 day passed, Set B started to send shoots out of the dirt. In the evening of the same day, Set A also started sending shoots up.
Set A currently has 12 shoots / 20 seeds, and Set B has 13 shoots / 20 seeds. So I'm pretty happy. The damp paper towl + heat seems to have sped up the germination process, though it had only 1 additional seed sprout. Hoping to have some healthy, adult sensitive plants soon!
INSTRUCTIONS! Fail-safe way to germinate these seeds!
by Jess (4 out of 5 stars)
April 3, 2014
Okay, there's nothing wrong with these seeds at all. The only problem is the instructions aren't fail safe. Here's what to do to ensure your purchase is NOT wasted.
These seeds are VERY tough, so they need extra effort to make them germinate.
FIRST Refrigerate for one week.
Then gather the following items:
- 1 cup of water than has been standing for 24 hours
- paper towels
- a plate
- a large ziplock baggie
- heating pad
This is the way I've germinated hard seeds since I was a child.
First, remove the outer skin of these seeds. They are in little pods. Take care. It is easy to confuse the seeds for their thin pods. The seeds are so small. That also makes the nick method of germinating very hard.
Place a layer or two of paper towels on a plate. Add enough water that it begins to climb up the towels, but is not standing in the plate. Place your seeds slightly spread out on the towels. Cover with another paper towel or two and press down so that the water starts to saturate the new cloths. add more water if necessary so that it's all saturated, but NOT dripping. Roll the towels up VERY loosely and place in the zip lock bag. DO NOT close the baggie all the way. Leave a 1-inch opening. I even open the baggie all the way a couple times a day and close back (with the one inch gap still in place) to let fresh air in. Plants need air.
Place the baggie back on the plate and place the plate on a heating pad on LOW in a safe place where it can be monitored. After just 24 hours, if you carefully unroll part of the baggie and separate the layers, you will see seeds popping open, and maybe even germinating. Placing in sunlight will help. The baggie will keep them from drying out. After 48 to 72 hours, they will be ready to place in seed pots. Make sure to keep damp, but not soaking. That will give them root rot. This plant likes plentiful water, but not standing water. It doesn't like to completely dry out between waterings. Hope this helps!
UPDATE:
I would say the germination rate for these seeds is closer to 20%, not the 88% advertised. Buy accordingly.
:(
by Jessica Garcia (1 out of 5 stars)
May 1, 2018
These are extremely difficult to get growing. I tried several different techniques suggested by past reviews. Soaked the seeds overnight, warm water, cold water, soaked in paper towels, cut the edge of the seed, took them out of the seed casing, left them alone, tried growing them in a humid environment, used tomato plant food, special annual potting soil, i even started talking to them at one point. I really had no luck at all. I've used most of the package at this point and was only able to get 3 seeds to germinate. After they started to grow leaves (I was very excited to see them!) they quickly died 2 days later unexplainably. Im still desperately trying to make more seedlings grow, but haven't had much luck.
Success! If you're having a hard time with Mimosa Pudica seeds, read this.
by Joshua (5 out of 5 stars)
April 26, 2017
Now that these seeds have sprouted and are growing quickly I feel comfortable giving a review.
If you're unsure about them, don't be. They do require a little bit of preparation to ensure the best germination rates but it's really not difficult and I've had fantastic results.
I started by leaving the seeds in the fridge for 5 days or so (this is called 'Cold Stratification'). Once that was done I did a bit of experimentation with scarification to see just how much the tough seed pods hindered germination. I cut about 1/3 of the pods completely open and removed the seeds inside, another 1/3 were just nicked but otherwise left intact, and the last 1/3 I did not touch at all. I then placed all of them in a warm container of distilled water and soaked them overnight. After this I planted them directly in moist soil and sat back to see the results.
After just a few days I began seeing tons of little sprouts from the seeds that I had removed from the pods, followed by the pods that I'd nicked open, and then a few from the pods I'd left untouched. After a few weeks the first sprouts are going strong and I'll occasionally even see a new sprout or two. The sprouts are very sensitive to cold and dryness so make sure to keep them wet and moist (but not soaked!) at this stage to ensure they get the best chance of growing up.
I'll update this review once every seed has either sprouted or proven that it won't but in the meantime I'll leave it at this:
The seeds are good and very quick to grow. I can see why trying to plant these without prep would be underwhelming but it doesn't have to be that way. Do your research, do your prep, and set them loose!
20% sprouted within a week
by Mary (5 out of 5 stars)
September 10, 2019
I planted 100 seeds and about 20 of them sprouted within the first week. I soaked the seeds in warm water for about 20 hours and then planted them in regular potting soil. I plan to repot them into a better-draining soil once they grow their first sets of true leaves.
I keep them 1 foot away from a sunny window, and run a space heater 3 ft away from the seedlings for a few hours a day (spread out into a few sessions each day) to keep them warm.
I got 20% to sprout so far, but I am by no means an expert. If you have more experience and take more care I bet you can get a better germination rate. For me, I am just trying to get a few house plants, so I have plenty of sprouts for my goals.
kept them in a plastic bag like a small green house be placed indoor by a ...
by Rita C (5 out of 5 stars)
July 27, 2015
Arrived on time. I first kept the seeds in refrigerator for a week, then soaked 20 seeds in hot water for one day, and planted them in peat pots, kept them in a plastic bag like a small green house be placed indoor by a window. Two third of them germinated in three days. I planted them each in a small pot and moved them to backyard . It's been three weeks now and they are growing nicely.
So Far So Good!
by RN (5 out of 5 stars)
June 12, 2016
So I'm not really a plant person and I don't grow a lot of them... However, sensitive plants are my favorite and I really wanted to try and grow them for myself since I haven't been able to buy them anywhere. So far I've planted 10 of the seeds. I soaked them in warm water overnight and they all sprouted a little bit. Then I planted 5 in a little plastic pot and 5 in a peat pot and I put plant food in both of the pots. I covered them both with plastic wrap for 5 days and made sure they got sunlight whenever possible. Both of the pots had 4 seeds sprout over the first 5 days. I took the plastic wrap off of them after they sprouted and just make sure they're watered and put in sunlight everyday, and that seems to make them happy. Now they're growing a little bit every day!
*UPDATE - 10.2.16*
I just wanted to add a few pictures of my little guy growing... I just re-potted him a week ago in the purple pot because he was getting too big. He's starting to flower as you can see in the picture :) My Mom is so impressed with how much it's grown that she asked me to start one for her!
Quality seeds!
by Valerie (5 out of 5 stars)
May 30, 2016
Based on the reviews of poor germination, I planted the entire packet. As suggested I put the seeds in the fridge for a week and then placed them in warm water (in a warm place) overnight. I saw that even in such a short time, many had already begun to germinate! I placed them in regular potting mix, very lightly covered with soil. I now have about 75 seedlings with true leaves that are already sensitive to touch! The kids love them! This will be a great addition to my botany class!
Customers Who Bought This Item Also Bought
- Seed Needs, Common Valerian (Valeriana officinalis) Twin Pack of 450 Seeds Each Non-GMO
- Jiffy J312 12Pel Wndwsll Greenhouse, Mini, Black with clear dome
- Outsidepride Mimosa Pudica Sensitive Plant Seeds - 1000 Seeds
- 3 Small Sized B52 Giant Venus Flytraps - Fly Trap - (Dionaea Muscipula) Carnivorous Plant 3 inch Pot
- Seed Needs, Chinese Lantern (Physalis Alkekengi) Twin Pack of 200 Seeds Each
- Mimosa pudica, Fairy Sensitive Plant
- Seed House-KOUYE 50pcs Mimosa Seeds Sensitive Plant (Mimosa Pudica) Colorful Shy Grass Seeds,"Do not Touch me" - The Plant responds to Touch- Garden/Indoor Plants Pot
- 100 Sensitive Plant Seeds - Mimosa Pudica, Moving Plant, Shy Plant, Shameful Plant, Touch-me-not - by RDR Seeds
- Lioder Sensitive Plant Seeds Mimosa Pudica Moving Plant Shy Plant Shameful Plant Seeds Bonsai Plant Home Garden Touch-me-not (50pcs, lila)
- Lioder Sensitive Plant Seeds Mimosa Pudica Moving Plant Shy Plant Shameful Plant Seeds Bonsai Plant Home Garden Touch-me-not (50pcs, Blue)
*If this is not the "Touch Sensitive Plants" product you were looking for, you can check the other results by clicking this link


